

Hello, friends! It’s Nellie again, from Sorry About the Mess! And I have a question for you. A serious question that I really want to know the answer to. What is the one sewing technique that scares the life out of you? That you figure out how to avoid at all costs? That you would love to master if someone would just show you the trick of it because there must be a trick because everyone else can do it.

These markings need to be transferred to your fabric. Now, let’s say your pattern calls for one-inch buttons and you decide you would like to use half-inch buttons but you want to have the buttons be more frequent to make up for the smaller size, or just to look pretty. You can absolutely do this! What a great idea! But you may have a little math to do to keep everything even. Now, I’m not going to give you this math, because it’s going to be different depending on the size buttons, size of the pattern and personal tastes, but I will show you a tool that will make this so much easier!
This is a sewing gauge. It is used to help plan the button placement you want on your pattern. I wish I had one to show you how to works. But this one isn’t mine, it’s from Amazon. This is not an affiliated link, just a link back to the product to give credit where credit is due.
Anyway, you can use this fancy tool to help calculate the distance of the buttons without any fancy math. How cool is that?!
Okay, so buttonholes have been marked! Step one down! Yay!
Next step!
Unless you are using a really heavy and stable fabric, you are going to want to stabilize your fabric before sewing buttonholes into it. You should have instructions in your pattern to the weight of the stabilizer you should be using, but a light to medium weight should work just fine. You will want a kind that is made for collars and buttons. I prefer to use iron-on interfacing, but where we will be sewing into this, you can use a sew-in stabilizer and it should work just fine, it just might slide around, but I wouldn’t know for sure, because I always use iron-on. Do not use an interfacing that is labeled as no-sew, it will gum up your needle something fierce, I learned that lesson the hard way, learn from my mistakes, my friends. But feel free to use knit interfacing on knit fabrics and woven interfacing on woven fabrics, unless your pattern specifically says different.
Real quick, I want to show you the difference between a buttonhole with interfacing and one without.
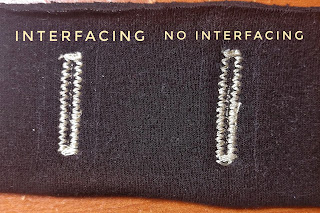
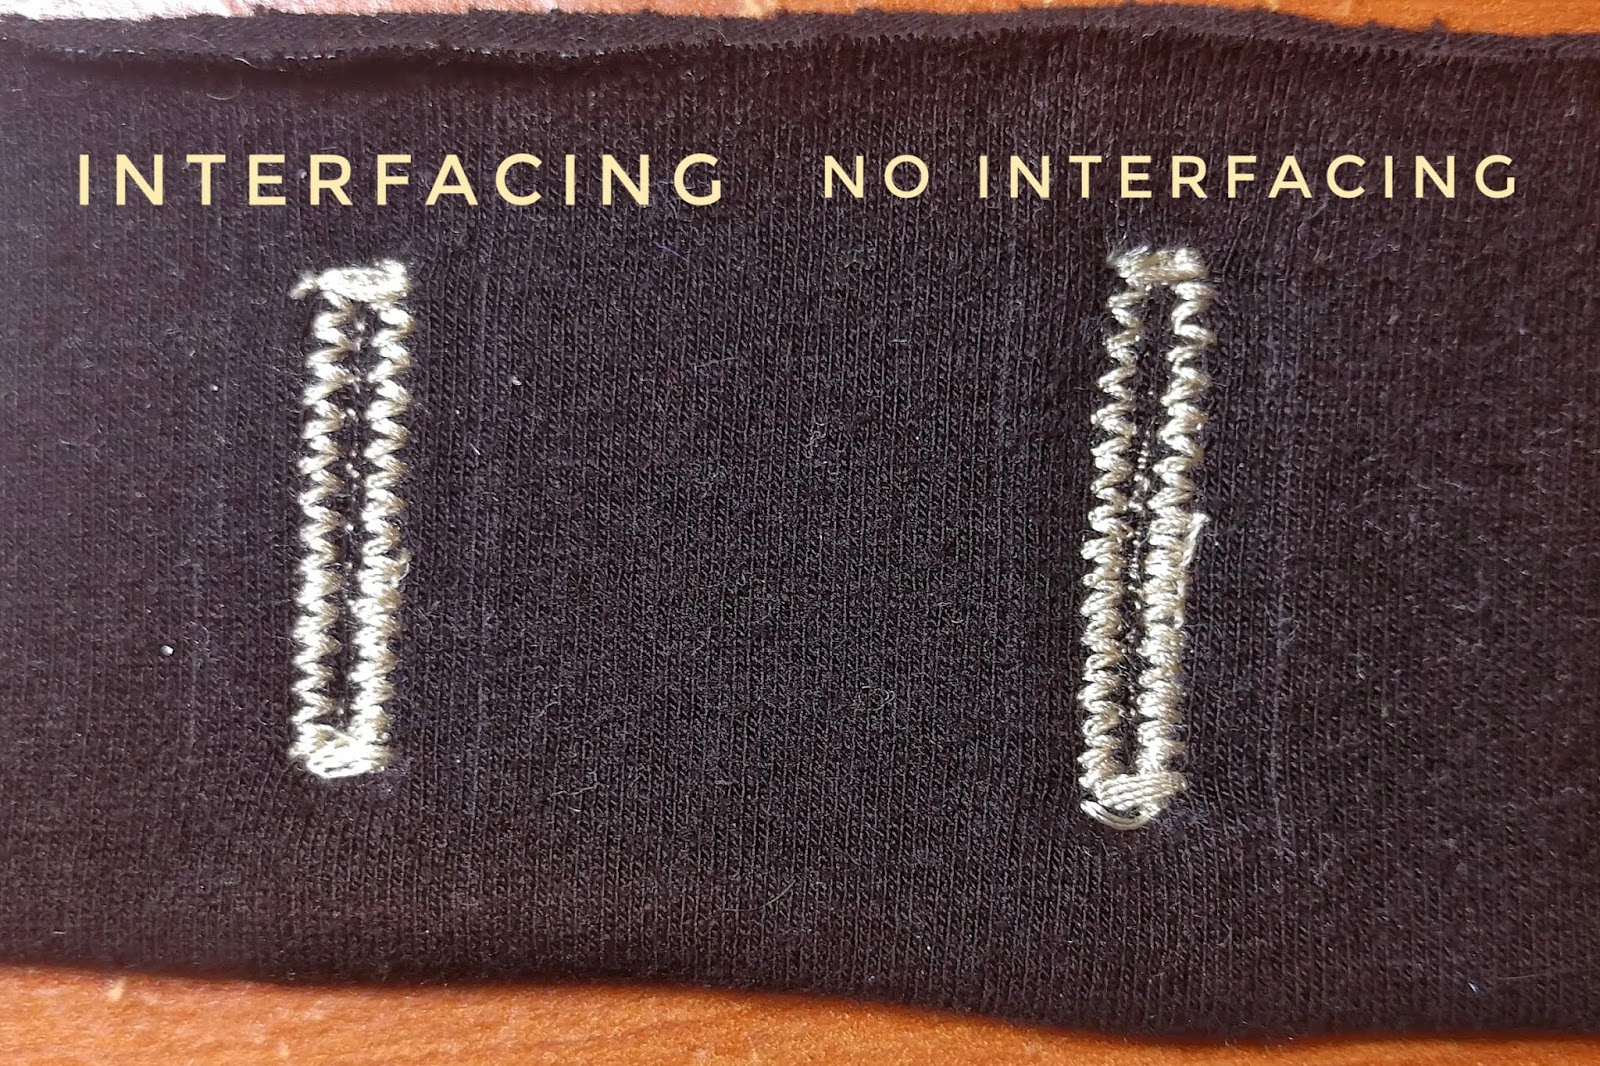
The one with the interfacing looks so much more crisp and clear and even. The one without has uneven stitches and is stretched out a little.
I have a Brother SE-400 and I have 10 different programmed 1-step buttonholes! And I am quite sure you could find more styles if you wanted to look. But because I only have my machine to play with, I’m only going to talk about these particular and common buttonholes.
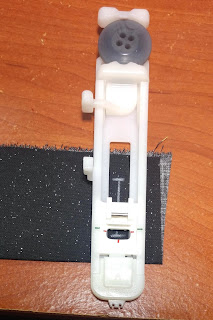
But before I delve into the looks and uses, I want to show you my buttonhole foot. From every angle.
This is what’s called a 1-step buttonhole foot. That just means that when I select the buttonhole I want to sew and set it up correctly all I will need to do is start the machine sewing and the foot will tell the machine all it needs to know about how and where and how big the buttonhole needs to be.

Press the release lever again and align the presser foot clamp with the little bar on the buttonhole foot and drop the presser foot lifter down until it latches onto the buttonhole foot.
The last step of attaching the buttonhole foot is the buttonhole lever. Pull down the buttonhole lever and it should sit between the two little tabs on the side of the buttonhole foot.
Select which buttonhole you need and you’re ready to start
This is a basic Square buttonhole. It is used on medium to heavyweight fabric and can pretty much be used anywhere. It has bartacks on both ends and is perfect for stabilized fabrics.
Square to rounded buttonhole. This is used mostly for thin to medium weight fabrics and on tops more than bottoms. The rounded part just gives the button a place to rest against easier.

This is a keyhole buttonhole. It is best used on very heavy, thick or plush fabrics and with larger buttons. That little keyhole at the end allows for a little extra room for the big button to squeeze through.
This keyhole buttonhole is pointed at one end, like the one above, it is for use on heavy, thick or plush fabrics that will have more strain put on them.
Here is a keyhole buttonhole with a reinforced bartack end. It is specifically used in horizontal buttonholes for heavy, thick or plush fabrics.
Next, we have some stretch buttonholes. They can also be used on woven fabrics for a more decorative looking buttonhole. This first one is specifically for use on stretchy fabric.
One last buttonhole from my machine. I won’t be showing an example of this buttonhole either, but it is a bound buttonhole stitch. Basically, each buttonhole looks like a tiny little welt. The stitch is just a straight one and can easily be done without the help of the buttonhole foot, but using it helps to keep each buttonhole uniform when making a bound buttonhole. If you get the chance to look one of these up, they are super cool! And used mostly on coats.

Line up your marks so that the top beam of the “I” is centered in the little hole of the buttonhole foot and the long center beam is running down the very center of the buttonhole foot. You are basically wanting to sew along both sides of the “I”. In this image, the buttonhole foot isn’t on the machine because I couldn’t get my camera in the machine to get the lines to show up properly.
Unfortunately, neither of my machines has this kind of buttonhole and the only place I have even seen one done is on YouTube. And I have this very deeply ingrained fear of plagiarism (thank you BA in English) so I would rather turn you towards one of those great tutorials rather then parrot what they have said. I am not going to leave you with a link just in case Eunoia would like to come up with their own tutorial. Just know that you are basically going to get the exact same results you will just have to move your needle to have it in the correct place while sewing each of the 4 lines that will create the buttonhole. This does not look to be a complicated process, especially with good marking (see, it really does come in handy!), just practice several times before doing it on your actual garment.

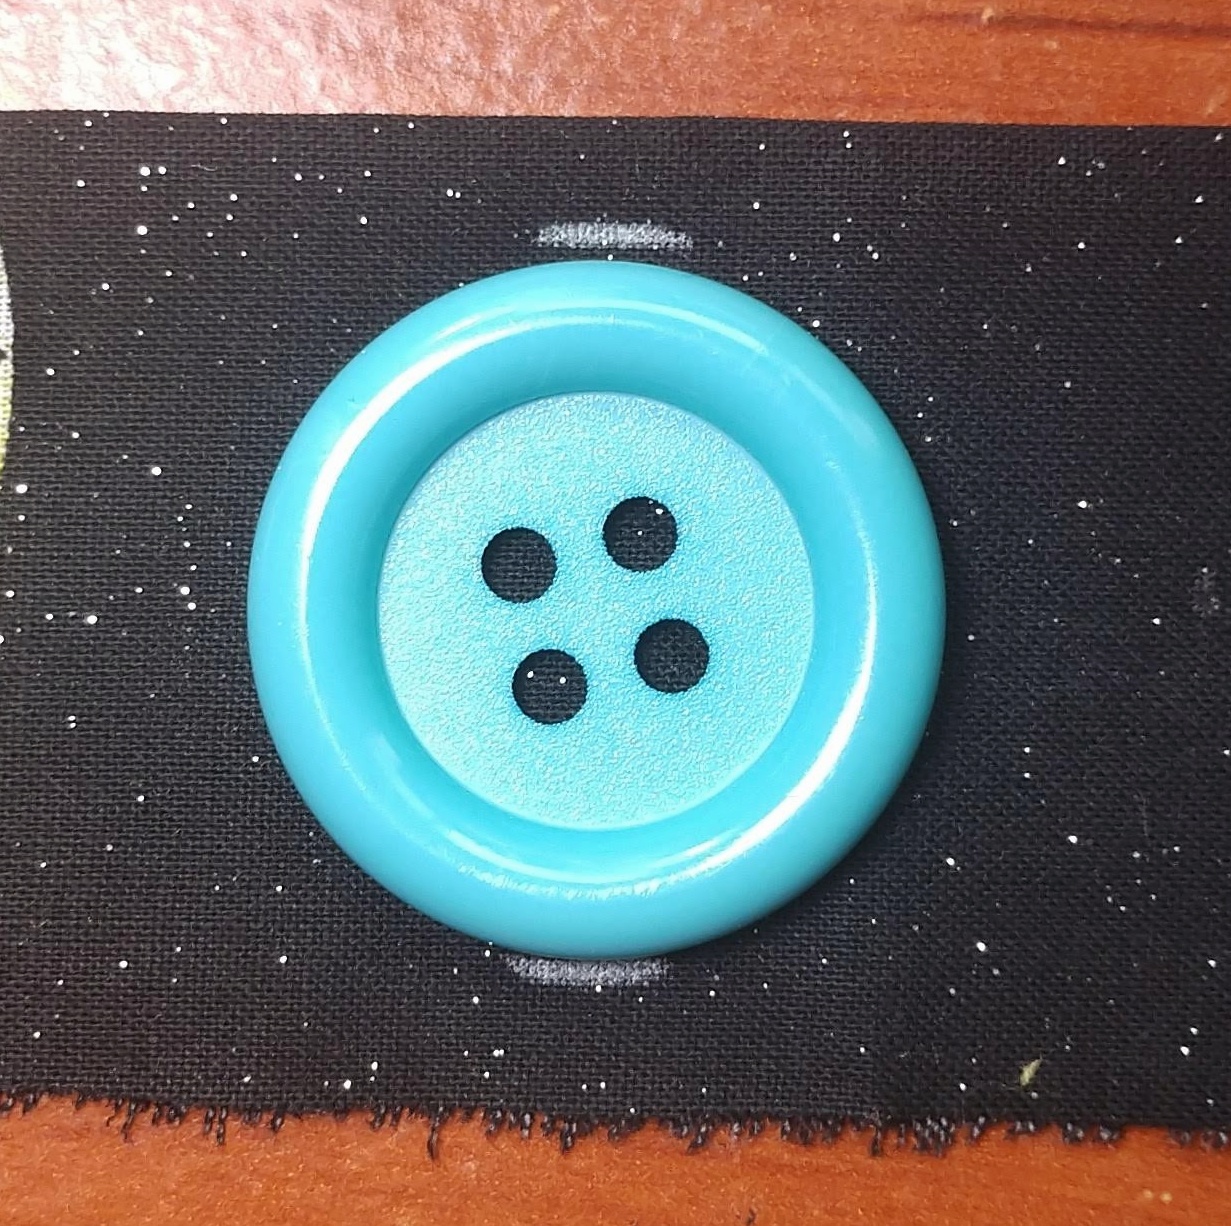
That button is NOT going to fit in that buttonhole foot. There is absolutely no way! But we aren’t going to give up hope. We now know how a buttonhole should look, so let’s just make one using the principles we’ve already learned. First step, make the fabric, whether you decide to adjust the spacing of your buttons is up to you. But you’ll need to mark your pattern so that the horizontal lines of the I shape can be seen on the outside of the button lip, or you can take your button size and add ¼ inch. I personally think just marking the outside of the button is easier.

Then draw a vertical line straight between the two lines.
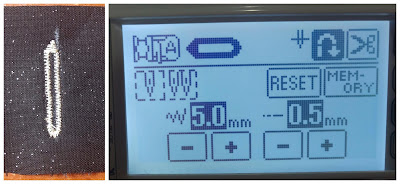
Now you are going to run a straight stitch down either side of the drawn vertical line.
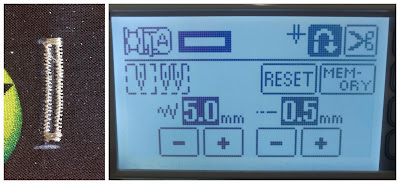
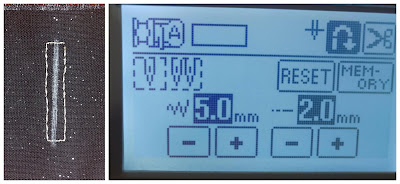
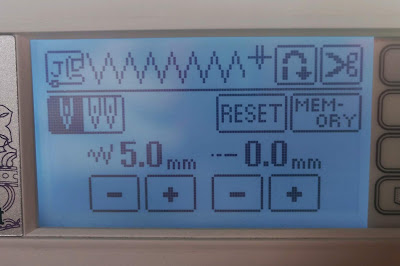
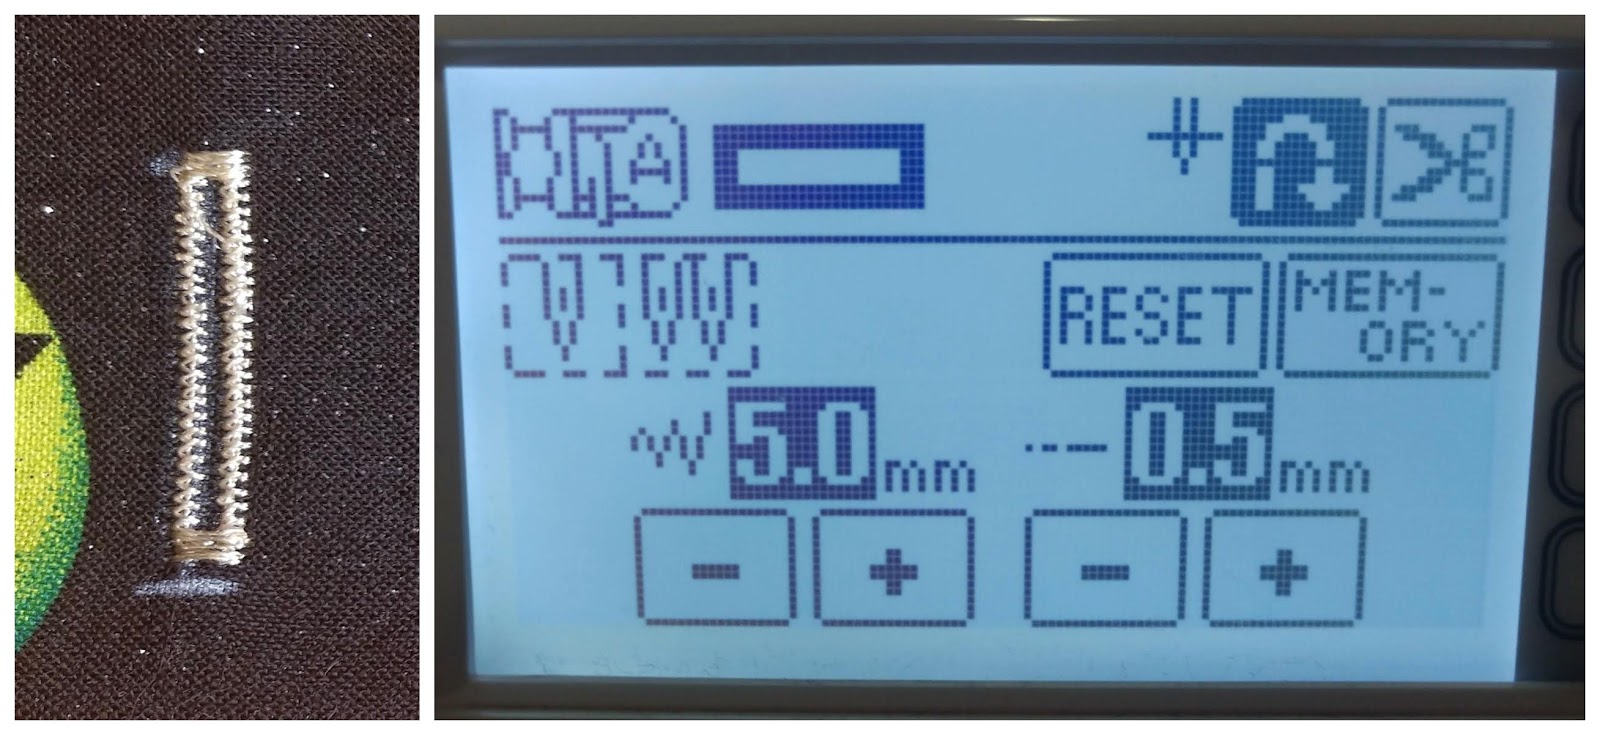
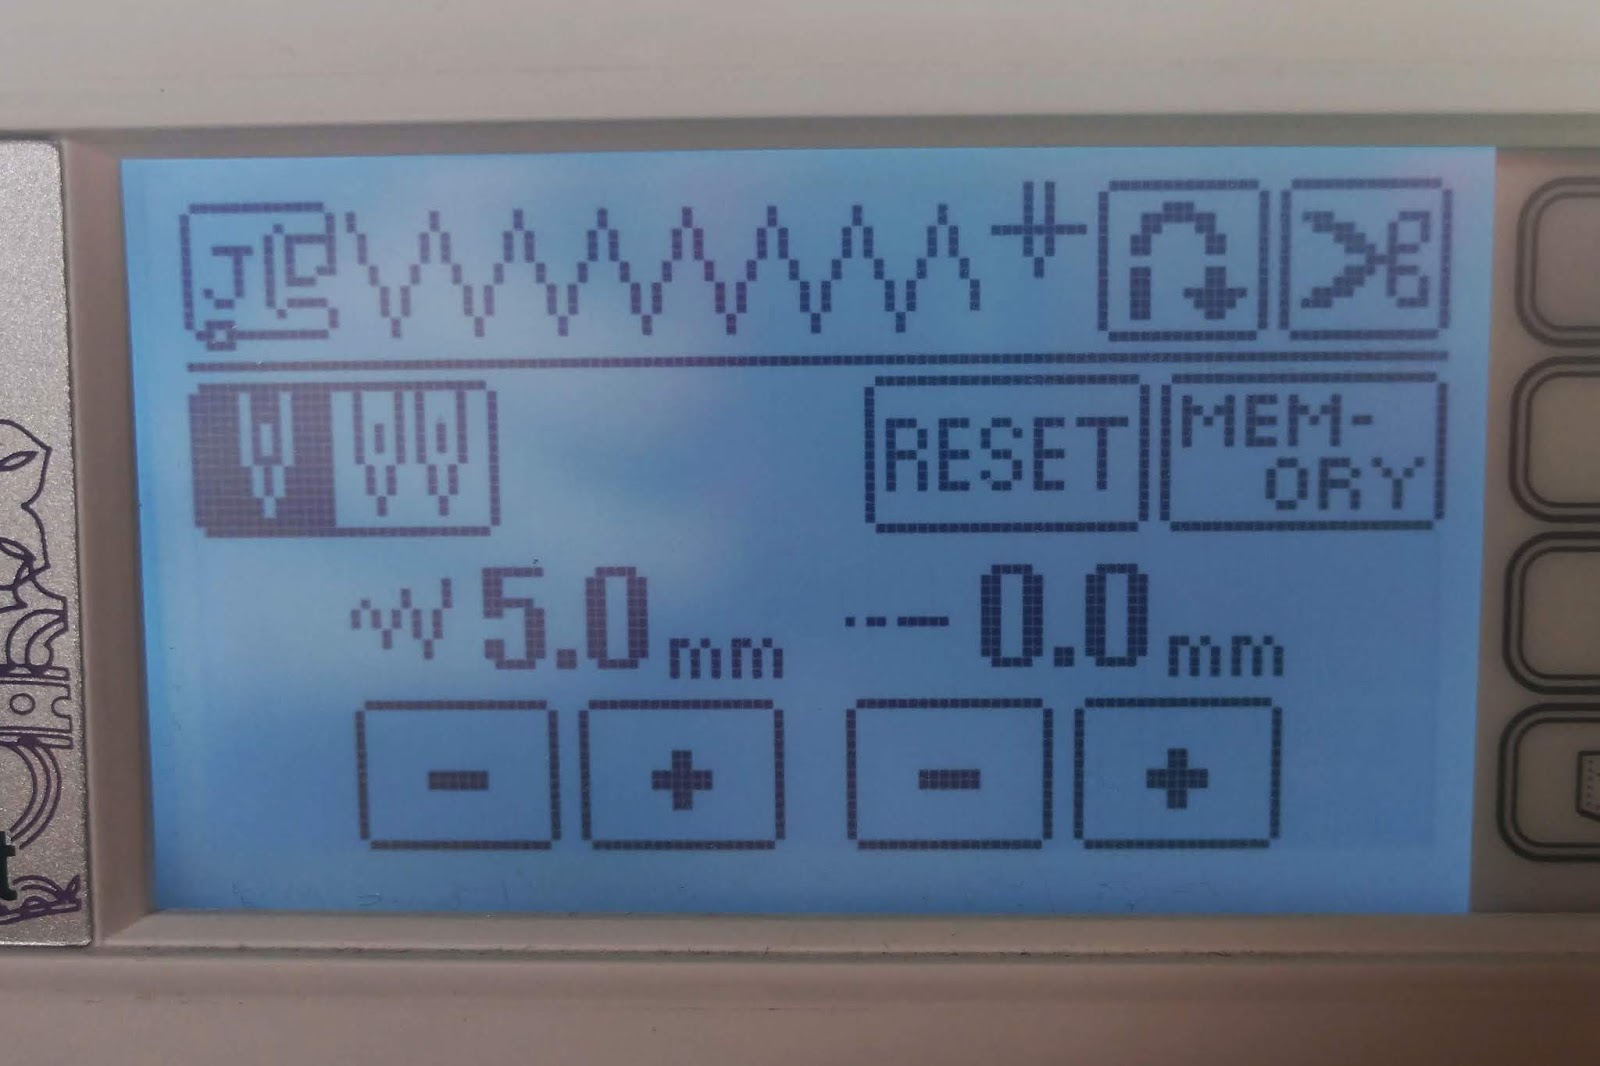
Now we are going to sew a bartack at the top and bottom, on the horizontal lines of the “I”. A bartack is a tight zigzag sewn just as a stable or secure point where there is lots of stress. You make a bartack by setting your zigzag stitch width at 5 mm and stitch length at 0mm.
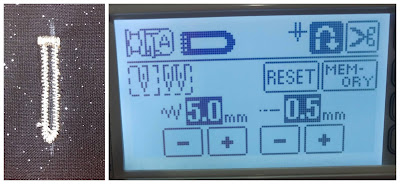
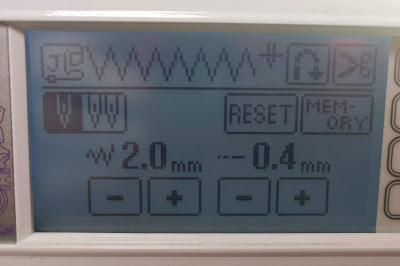
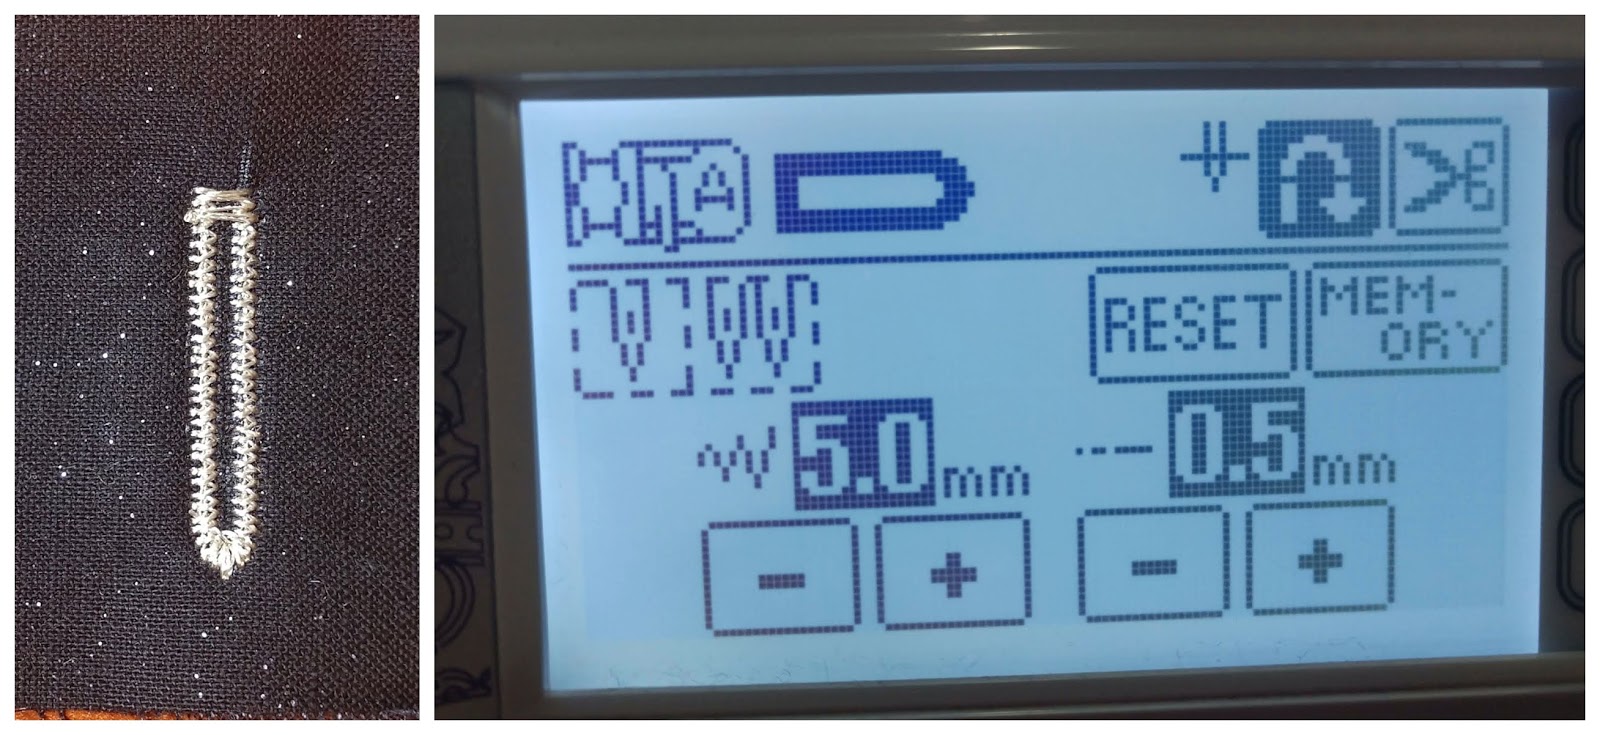
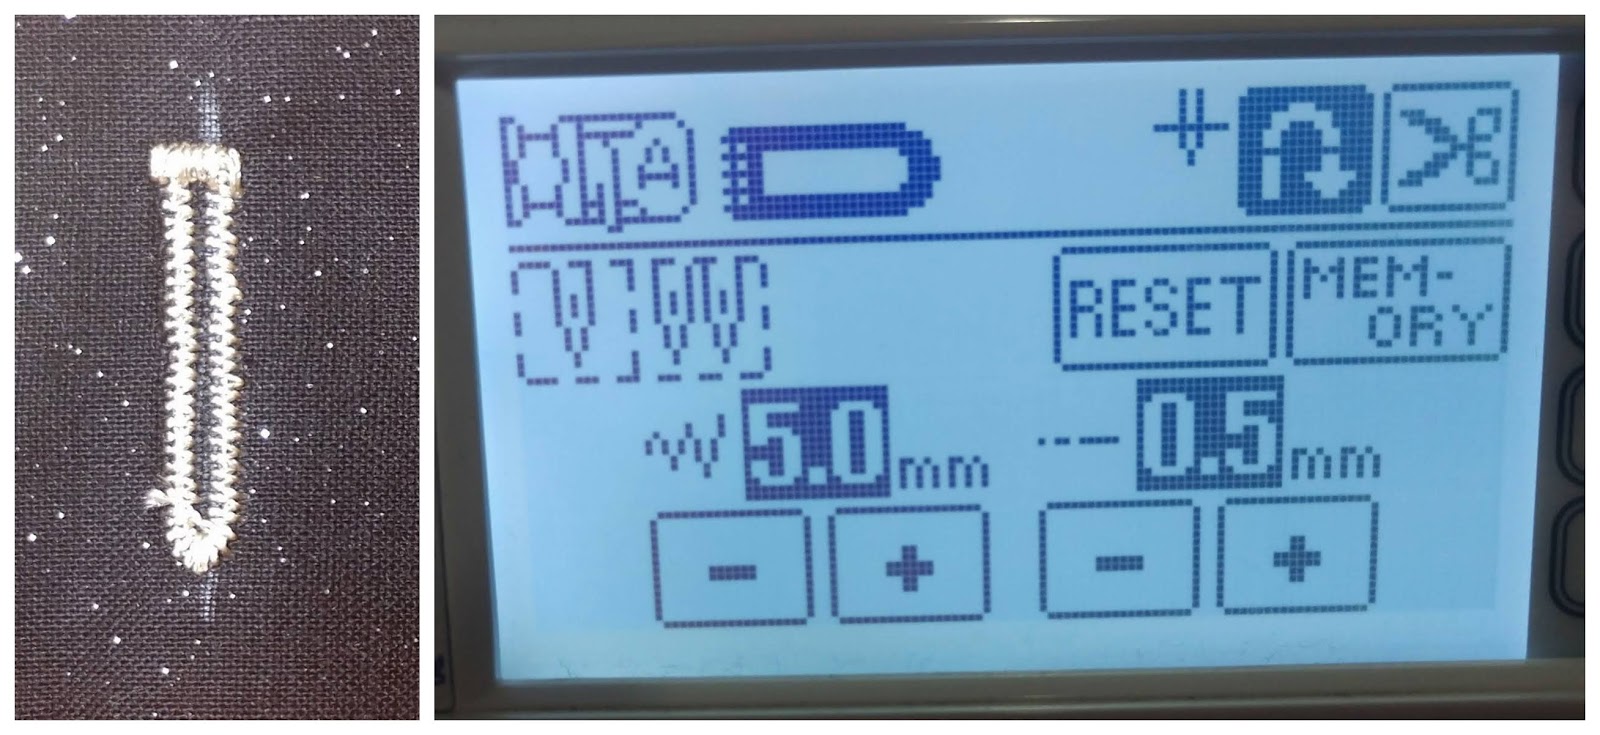
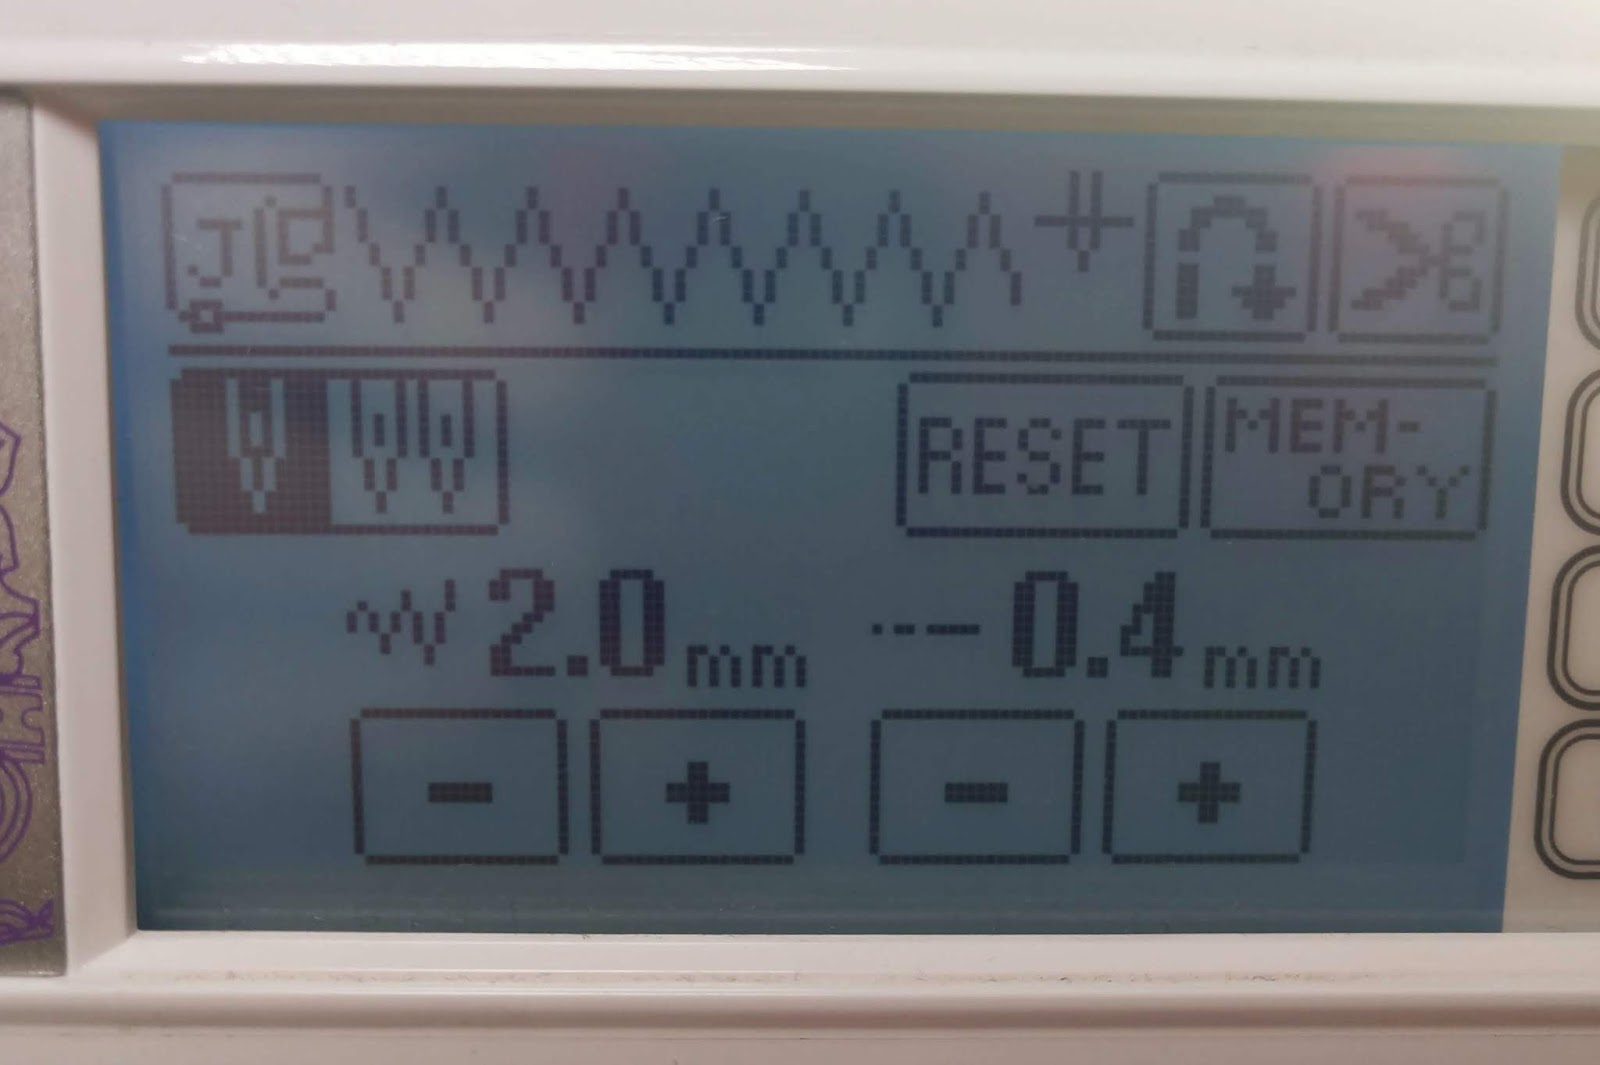
You only need to do like 4 stitches and backstitch, or you can move on to the next step without backstitching or cutting your thread. You are going to then raise the needle on your machine, change the stitch width to 2 mm and the length to .4 mm and using the straight stitching you did before as a guide, zip zag from the top bartack to the bottom button marking. Then you will do the same as before, do a small batch stitch or just adjust your machine so that it will sew the bottom bartack in the correct placement across the bottom of the button marking. Adjust the width to be 5 mm and the length to be at 0 mm and stitch the bartack. You will then finish up the last side of the buttonhole just like the other, with a stitch width of 2 mm and length of .4 mm.
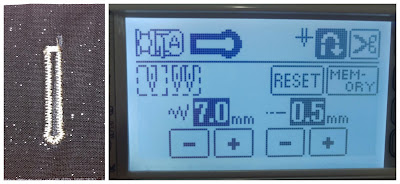
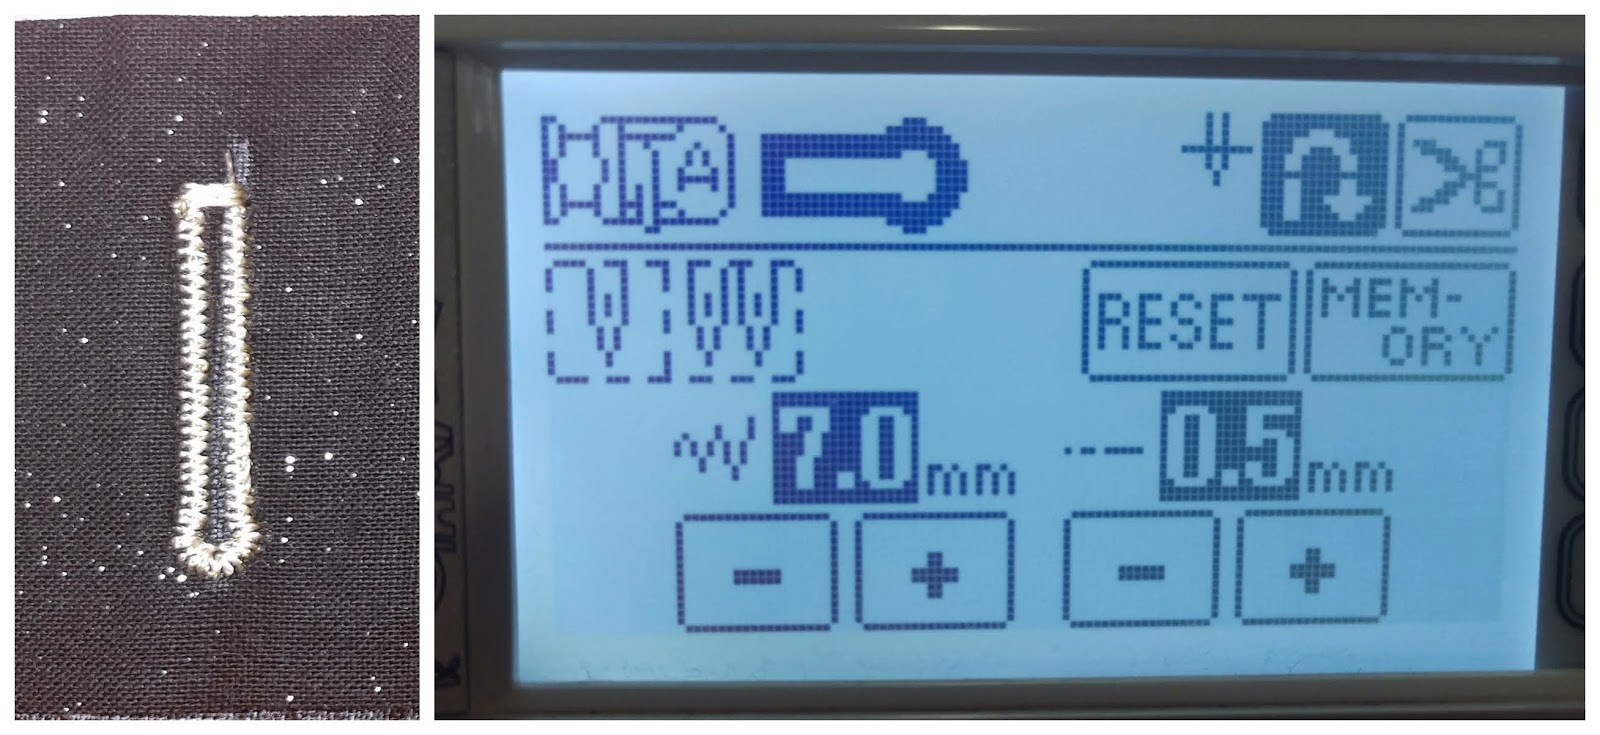
Your final results, once the strings are trimmed, should look something like this.
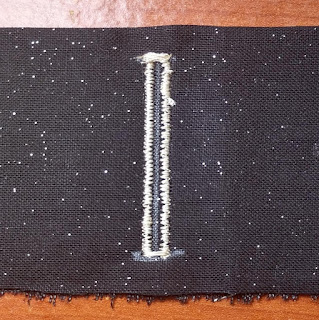
Don’t worry if it’s not perfect. Once a button is inside no one will be able to tell if it’s a little wonky, as long as it works!
I think they look awesome if you are making lots and lots of buttons all the same size and shape. I haven’t found a need, or even desire to own this tool yet, but it’s kind of neat. I will probably still always use my trusty seam ripper and a few pins.
Why the pins, you ask? Well, you use the pins to stop yourself from ruining your lovely buttonhole that you’ve worked so hard to create. Let me show you!
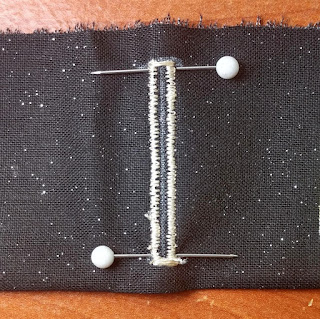
Put a pin on the insides of the bartack. This way then you slice the fabric between the pins will stop you from slicing the bartack.
And there we have it! A completed buttonhole! Yay!!


Now you are going to stitch around the buttonhole from the inside of the hole to the outside. You can use whatever stitch you want but I’m going to attempt to use a blanket stitch to give it that little ridge around the edge.
Please don’t laugh so hard that you hurt yourself with this next photo. My blanket stitch went a little crazy on me on the one side. Its a really good thing this one is just for an example and not going on an actual garment, I would be unpicking it so fast!

If you use a bit thicker thread, like part of an embroidery floss or actual button thread, it will be thicker and look nicer, as well as hold up to the stress of buttons a lot better.
Now we just need to attach a few buttons and we are finally good to go!
This is my button sewing selection. Not all machines have this option, but for those that do, I want to show you this, because it’s so cool!
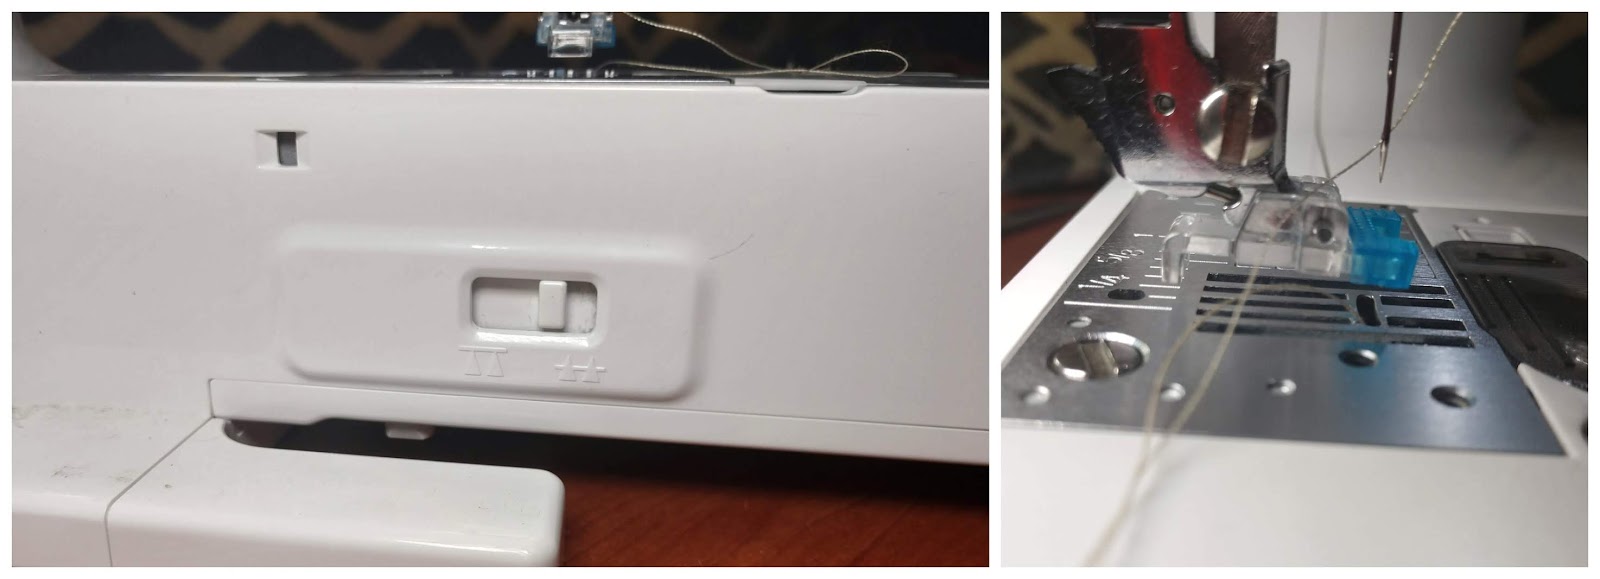
The first thing I’m going to do is put the button stitch foot on my machine and then drop my feed dogs with this switch on the back of my machine. Please check your manual for the exact way to do this.

Now, to be completely honest, I have done this stitch with the feed dogs still engaged and my buttons came out just fine, but I have to suggest that you do as I say and not as I do on this one, because I don’t know what could happen if we don’t follow the directions. Let’s try to be safe rather than sorry.
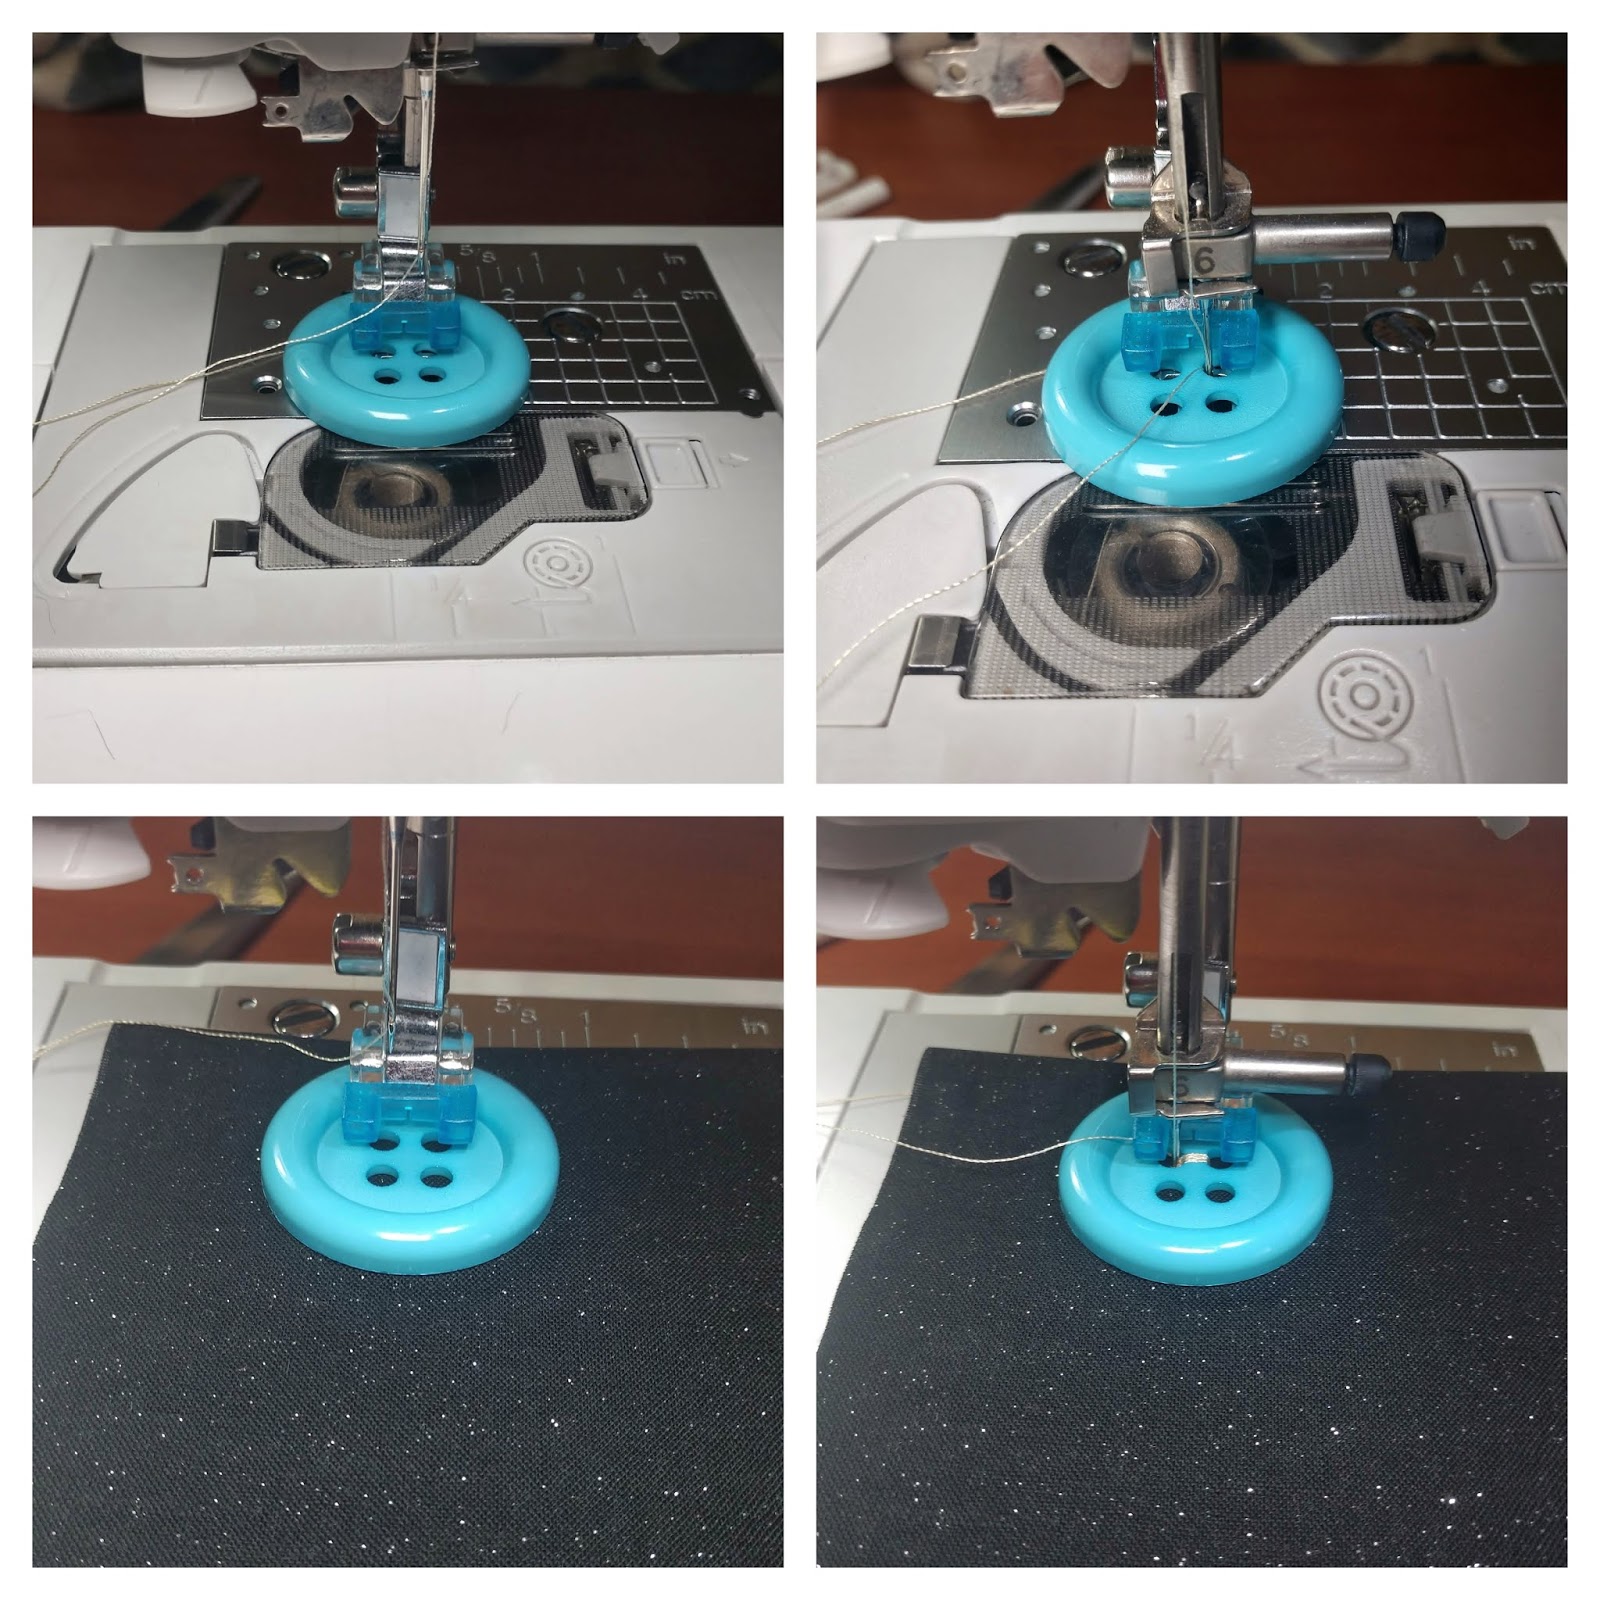
You are going to adjust the stitch width so that the needle will fall inside the holes when you sew. I like to do this by putting the button in place and use the hand crank to put the button up and down while adjusting to make sure I’m not hitting any edges.
When I’m pretty sure I’ve got it right I put the fabric in place with the button in the correct location and press on the presser foot and it goes! If you are using a 2 hole button you are nearly done. If you are using a 4 hole button you need to shift your button and sew it one more time. Then lift out the needle and pull out the threads. If you have an automatic thread cutter, DO NOT use it! You need your threads long to knot them in place. If you take the two long threads on the back of the fabric and tug on them just a little you will begin to bring the upper threads down. I don’t have a photo of this because it was really hard to see, to begin with, and I’m not sure a photo would help much. But you will eventually have all 4 threads, upper and lower on the bottom of the button/fabric. Tie them together, once for each side and make a knot then you can trim the threads and you’re done!

Last but not least, we have 2 and 4 hole buttons. They will actually be sewn exactly the same way, only one will have more stitches than the other.
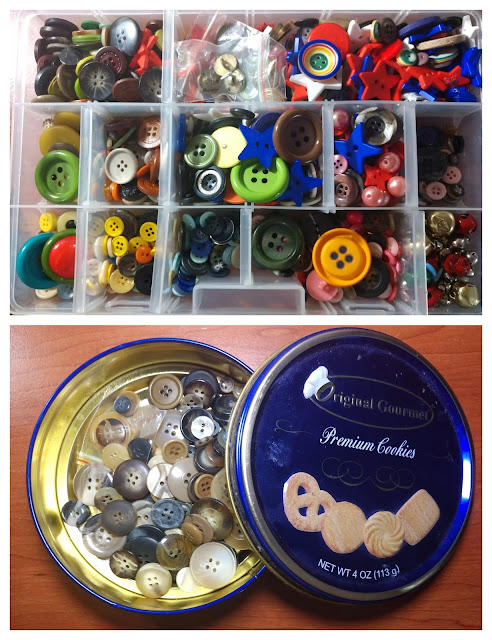
Oh, my friends! That was a lot to sit through. I am super impressed that you have made it this far! Thank you for joining me on this journey through buttonholes and their many creations and buttons and their fun! I have a deep love for buttons and a collection that rivals my mother’s!
I sure hope that you have come to appreciate and understand buttons just a little bit more, at least enough to make them a little less scary.
I look forward to seeing all of your Goodnight Darling Nightgowns and RobesT with buttons in the very near future!
If your answer isn’t buttons and buttonholes, then we need to be having a whole different conversation, my friend. But for now, let’s just talk buttons and buttonholes and leave all that other stuff for another day.
Buttons, as intimidating at they may seem really aren’t that difficult, once you understand the basics. First, when you have a pattern and you know buttons are needed, the pattern should give you some indication of the size button (not that you need to use buttons of that size, but they are usually what is recommended). This button size should be written right into the pattern with the notions needed. You are more than welcome to use whatever size buttons you want, just keep in mind that the specific look the pattern was designed for may be based around the buttons and changing them, while fun and probably super adorable, can change the balance of the pattern and you may need to adjust the spacing and size of the buttonholes.
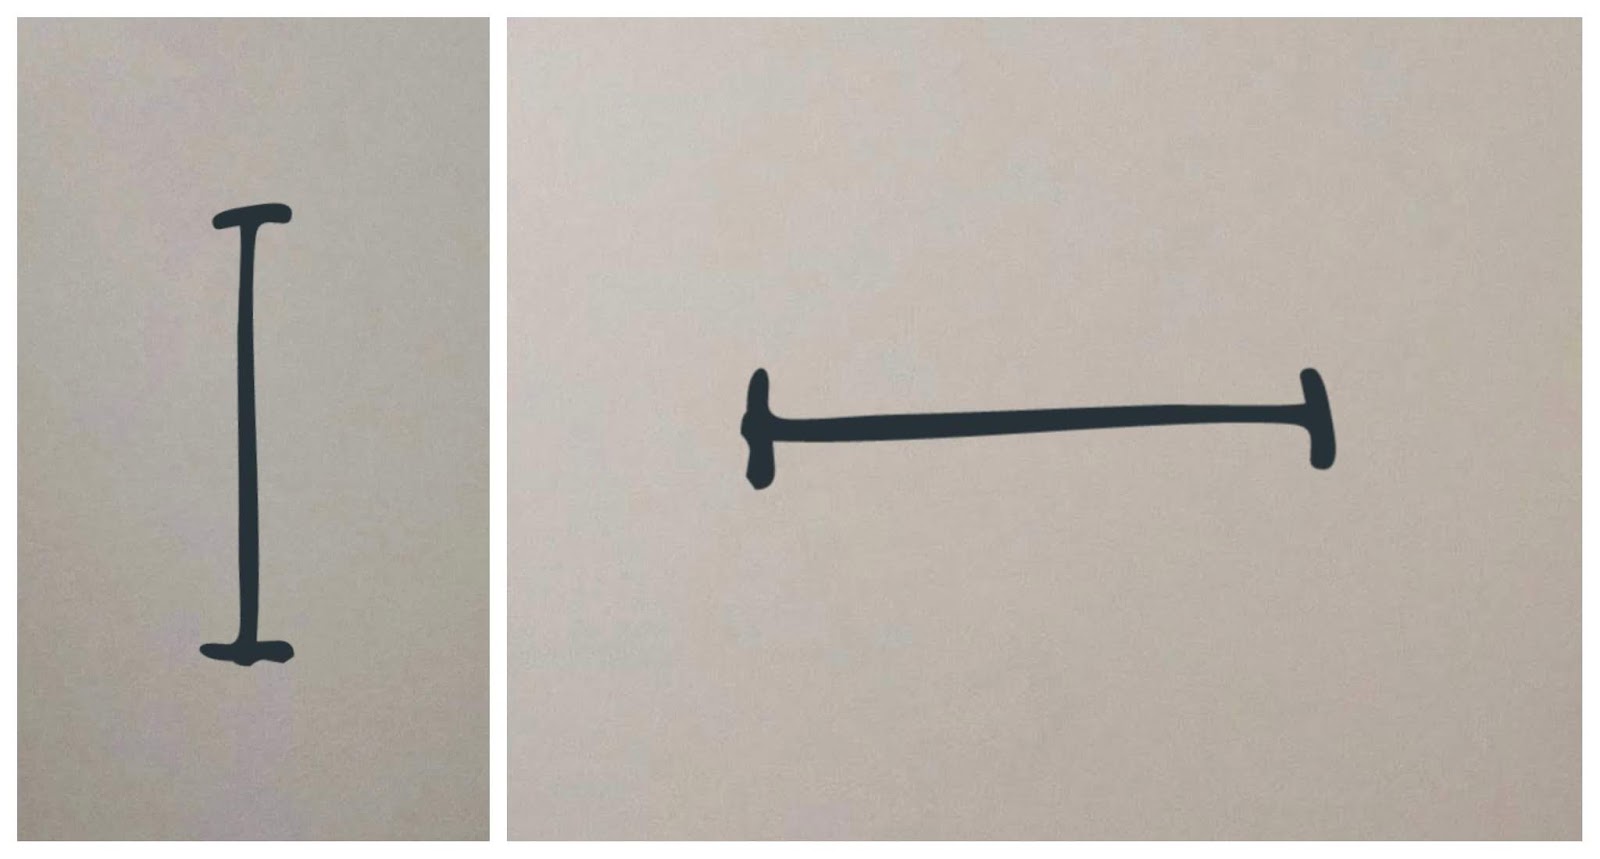
Buttonhole placement
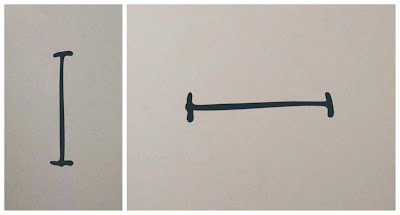
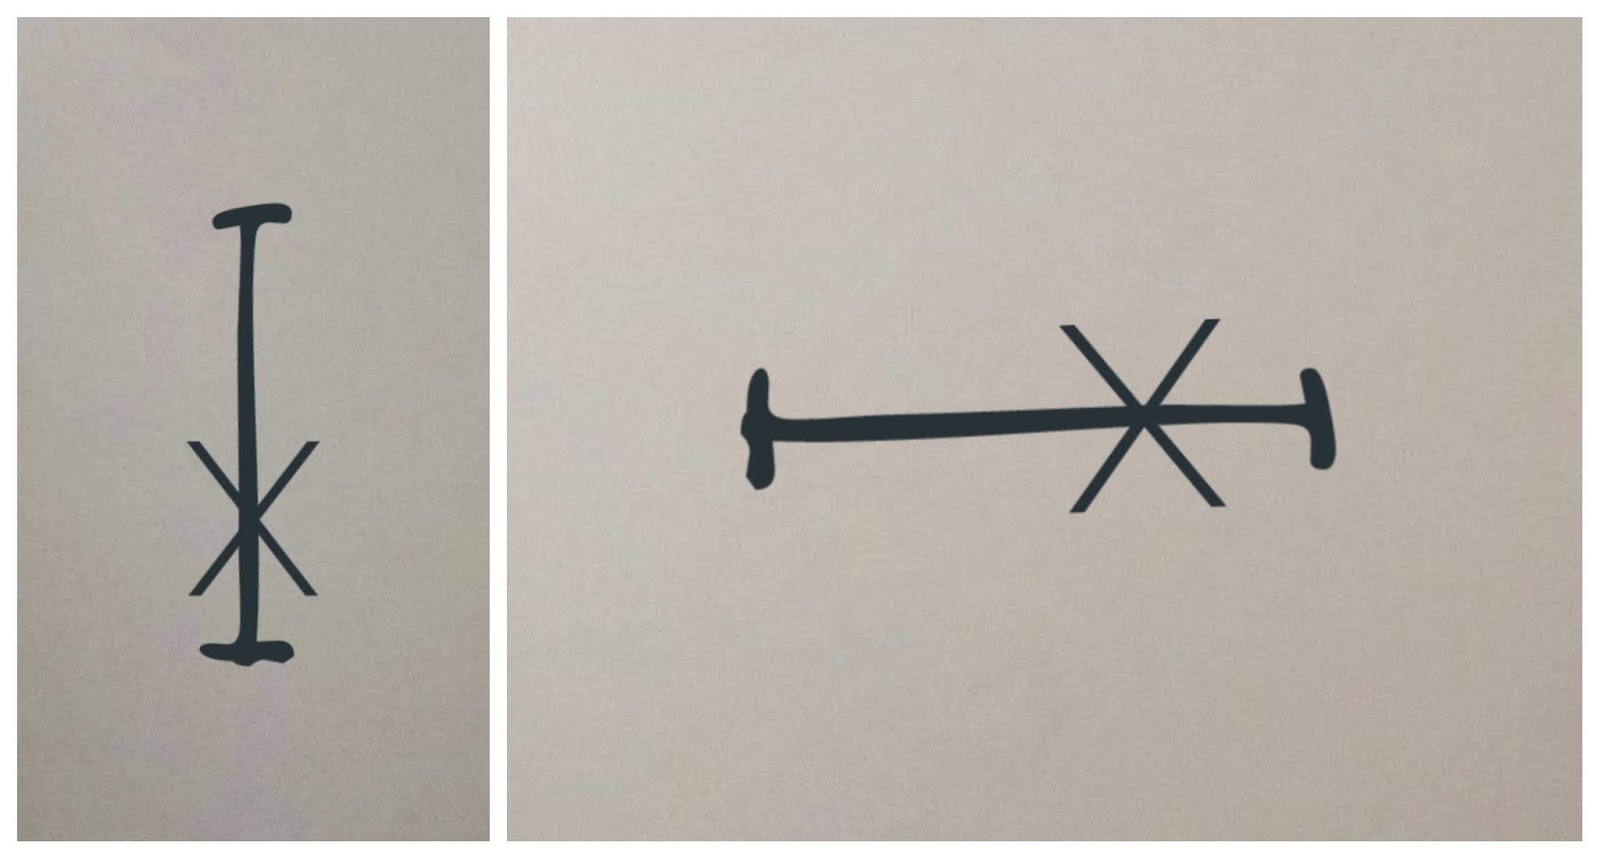
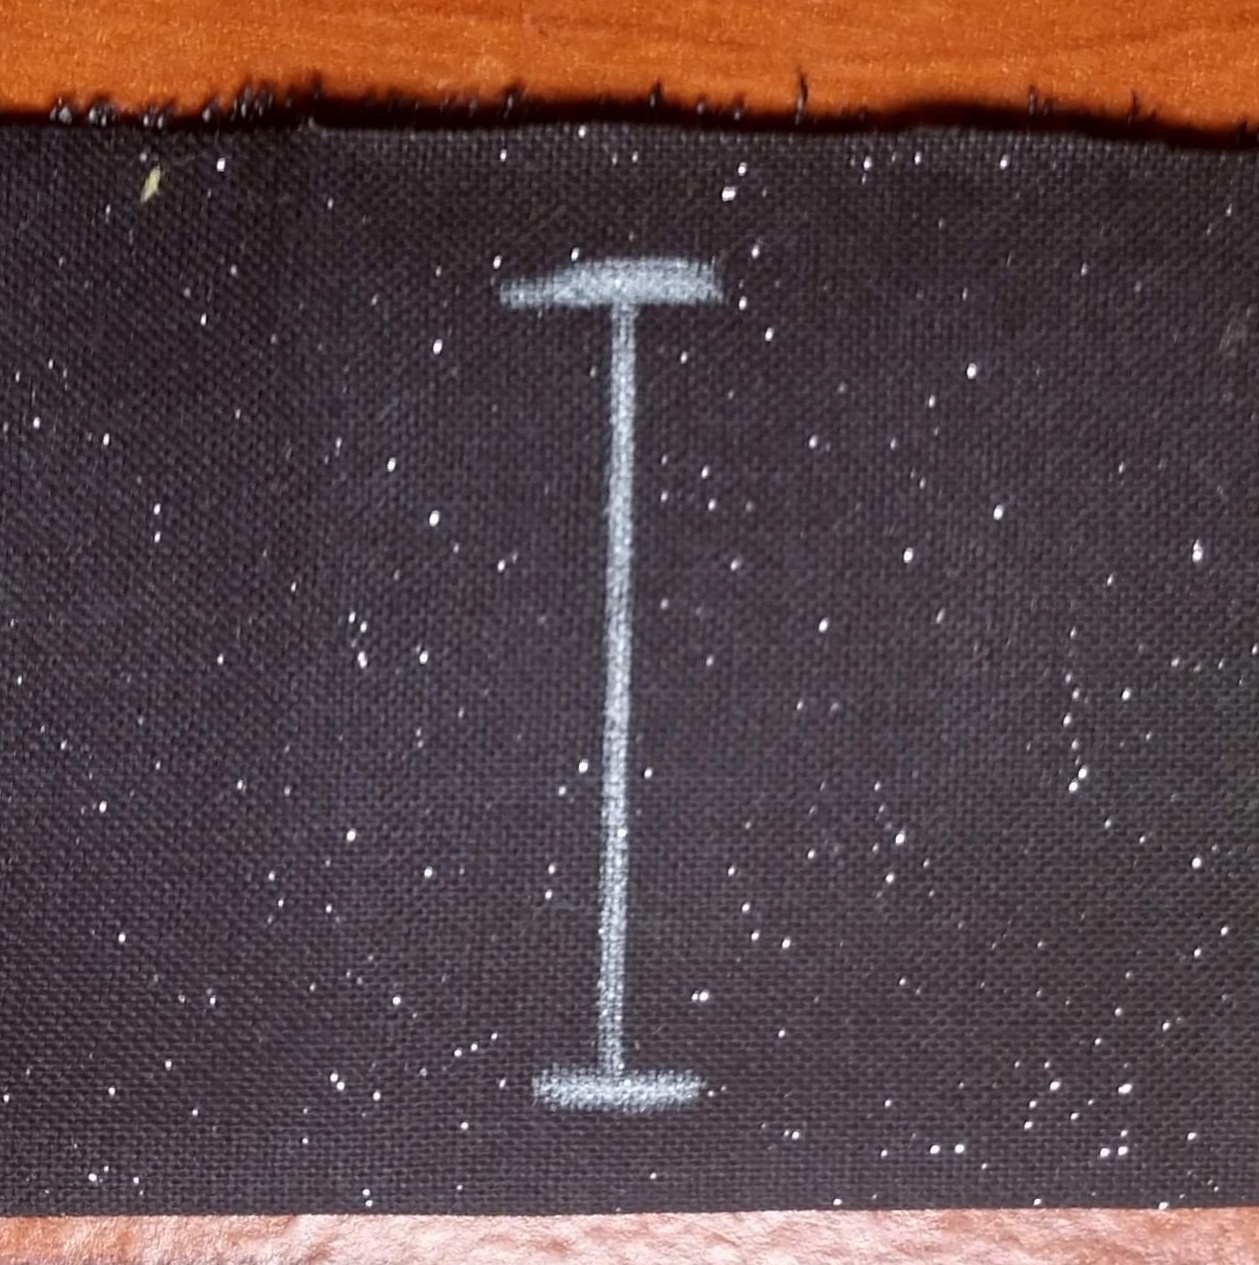
Generally, buttonhole placement is marked with a large “I” shape that is either vertical or horizontal “H” depending on which way the buttonhole needs to be. Usually, but not always, there can be an X indicating the actual button placement. It may be on the opposite piece from the buttonhole (just like a button would be opposite a buttonhole) or it may be on the buttonhole, or it may be missing altogether. That’s okay, a button and a buttonhole go together, so if you’re missing the “X” just use the buttonhole placement guide, it won’t steer you wrong!
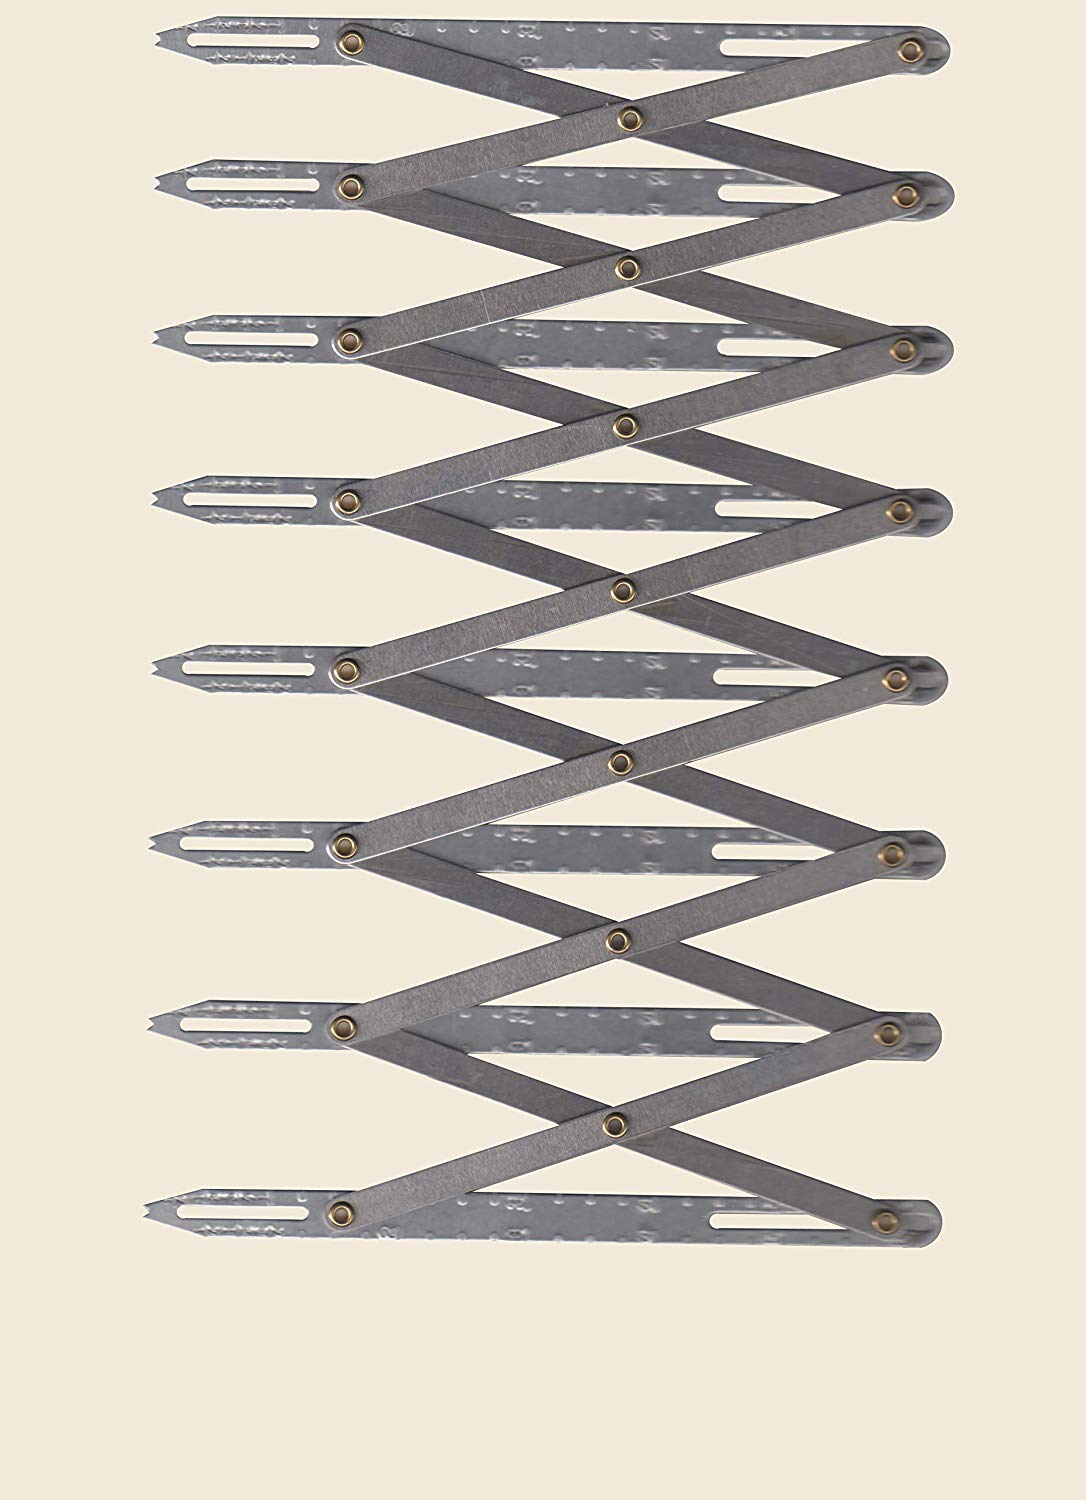
These markings need to be transferred to your fabric. Now, let’s say your pattern calls for one-inch buttons and you decide you would like to use half-inch buttons but you want to have the buttons be more frequent to make up for the smaller size, or just to look pretty. You can absolutely do this! What a great idea! But you may have a little math to do to keep everything even. Now, I’m not going to give you this math, because it’s going to be different depending on the size buttons, size of the pattern and personal tastes, but I will show you a tool that will make this so much easier!
 |
| Photo from Amazon |
This is a sewing gauge. It is used to help plan the button placement you want on your pattern. I wish I had one to show you how to works. But this one isn’t mine, it’s from Amazon. This is not an affiliated link, just a link back to the product to give credit where credit is due.
Anyway, you can use this fancy tool to help calculate the distance of the buttons without any fancy math. How cool is that?!
Okay, so buttonholes have been marked! Step one down! Yay!
Next step!
Stabilization!
Unless you are using a really heavy and stable fabric, you are going to want to stabilize your fabric before sewing buttonholes into it. You should have instructions in your pattern to the weight of the stabilizer you should be using, but a light to medium weight should work just fine. You will want a kind that is made for collars and buttons. I prefer to use iron-on interfacing, but where we will be sewing into this, you can use a sew-in stabilizer and it should work just fine, it just might slide around, but I wouldn’t know for sure, because I always use iron-on. Do not use an interfacing that is labeled as no-sew, it will gum up your needle something fierce, I learned that lesson the hard way, learn from my mistakes, my friends. But feel free to use knit interfacing on knit fabrics and woven interfacing on woven fabrics, unless your pattern specifically says different.
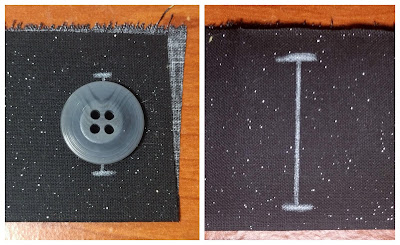
Real quick, I want to show you the difference between a buttonhole with interfacing and one without.
Speaking of the “look,” did you know there is more than one kind of buttonhole? There are a whole bunch!
I have a Brother SE-400 and I have 10 different programmed 1-step buttonholes! And I am quite sure you could find more styles if you wanted to look. But because I only have my machine to play with, I’m only going to talk about these particular and common buttonholes.
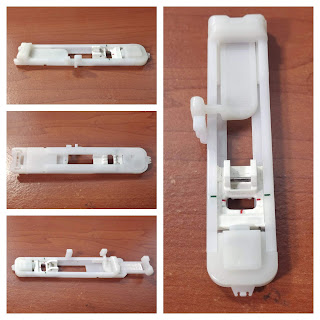
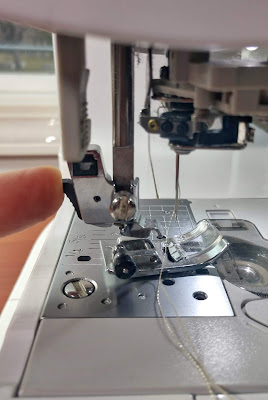
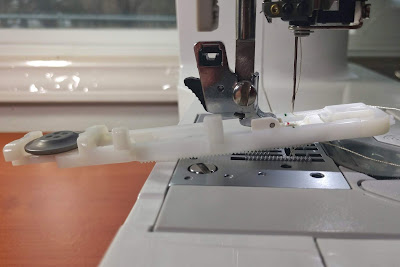
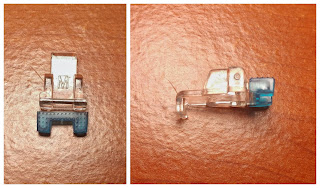
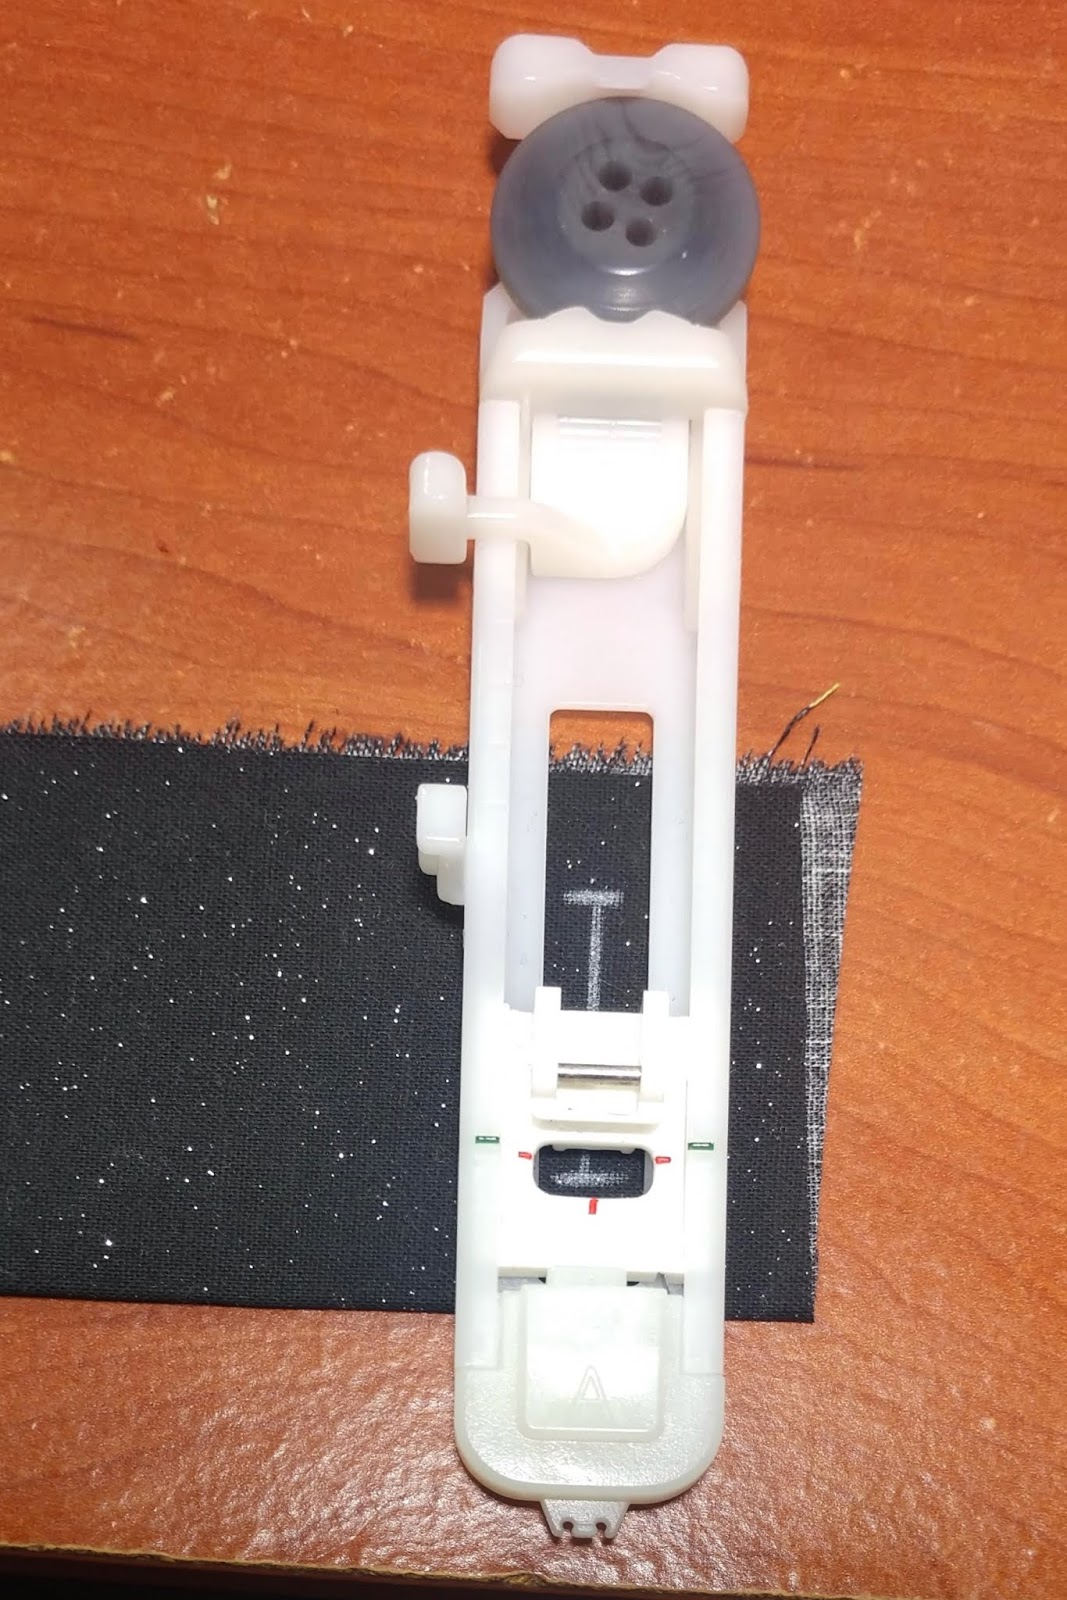
But before I delve into the looks and uses, I want to show you my buttonhole foot. From every angle.

This is what’s called a 1-step buttonhole foot. That just means that when I select the buttonhole I want to sew and set it up correctly all I will need to do is start the machine sewing and the foot will tell the machine all it needs to know about how and where and how big the buttonhole needs to be.
The Process
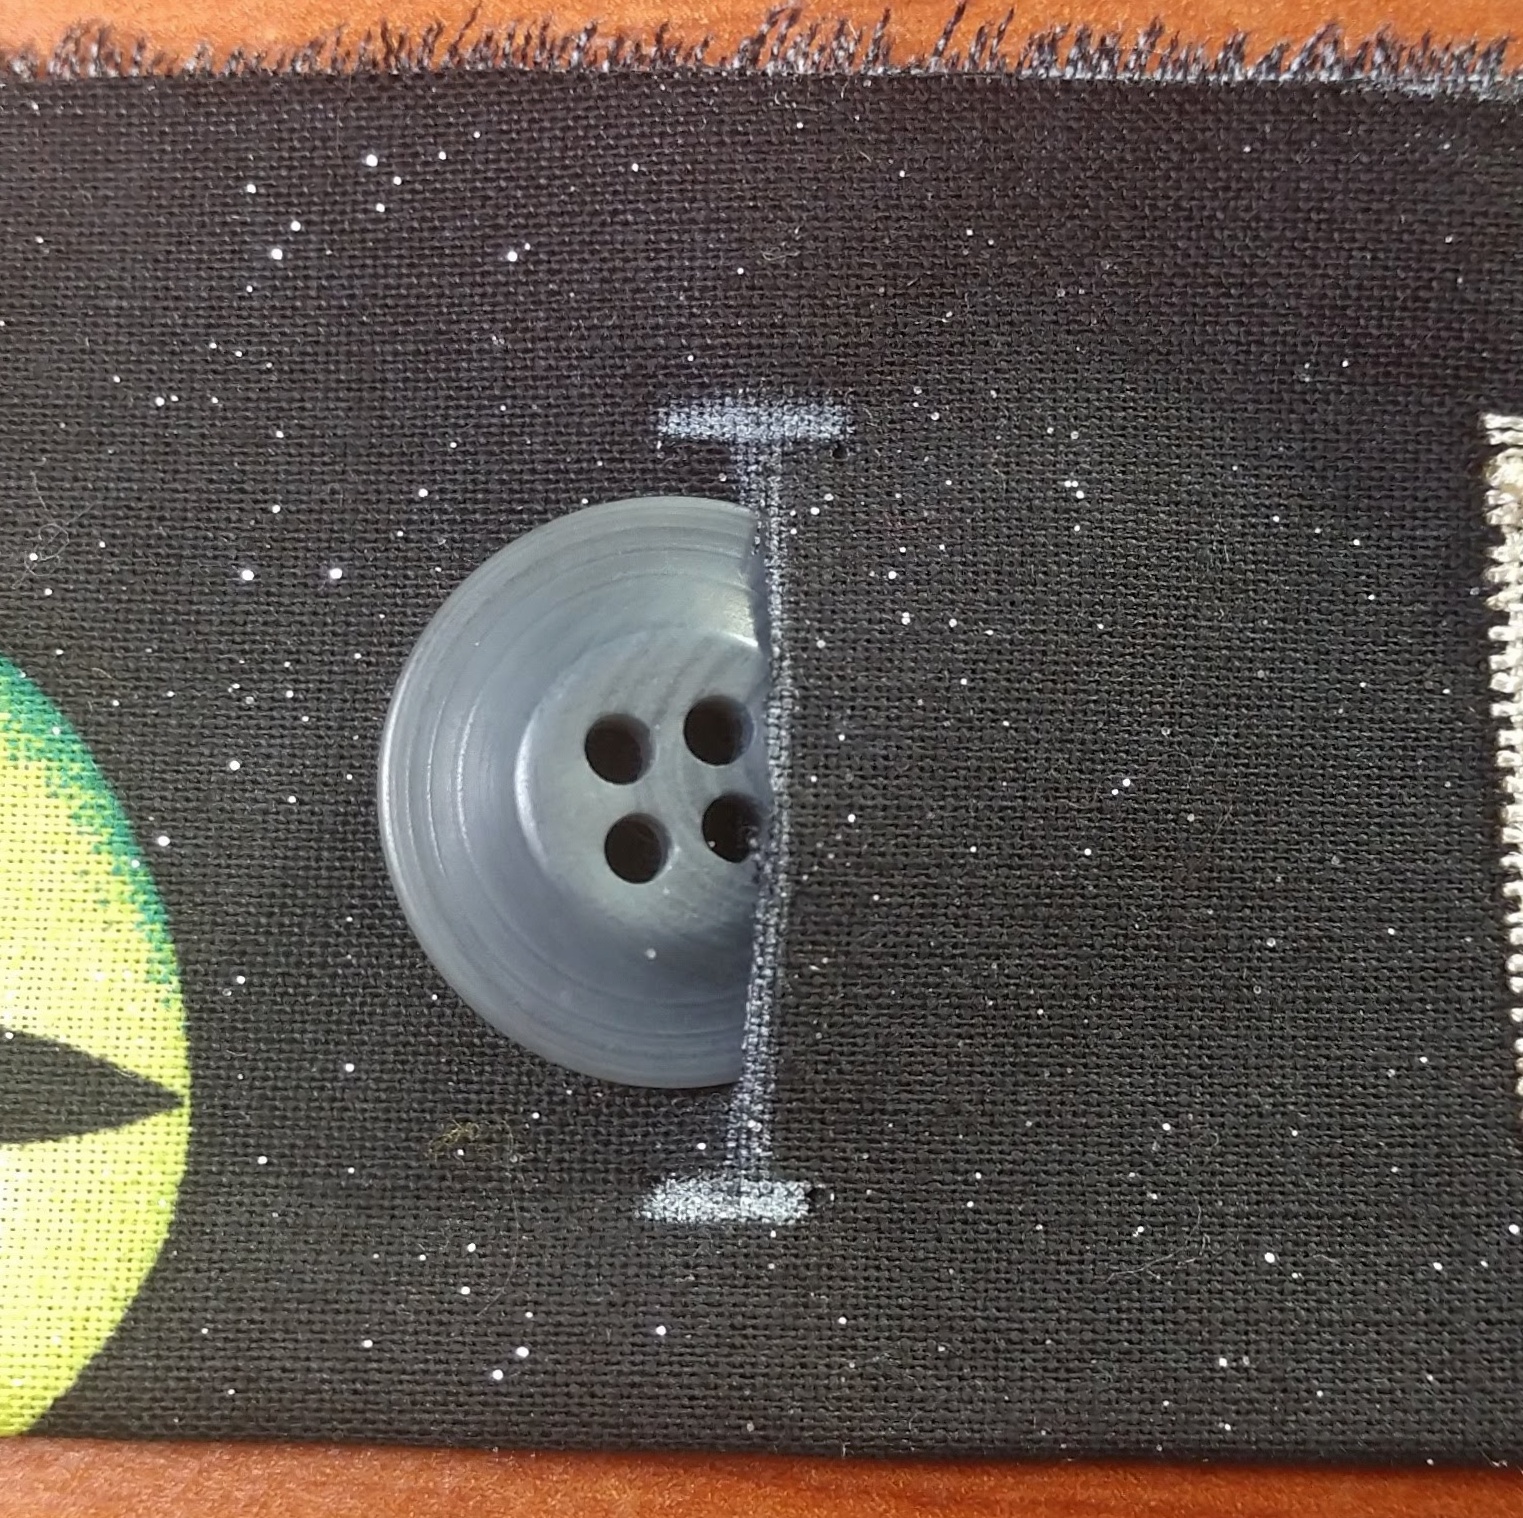
Here is a stabilized piece of fabric all ready to take on a buttonhole, notice the buttonhole placement mark. Select a button that fits within the mark with the tails of the “I” sticking out from either side of the button.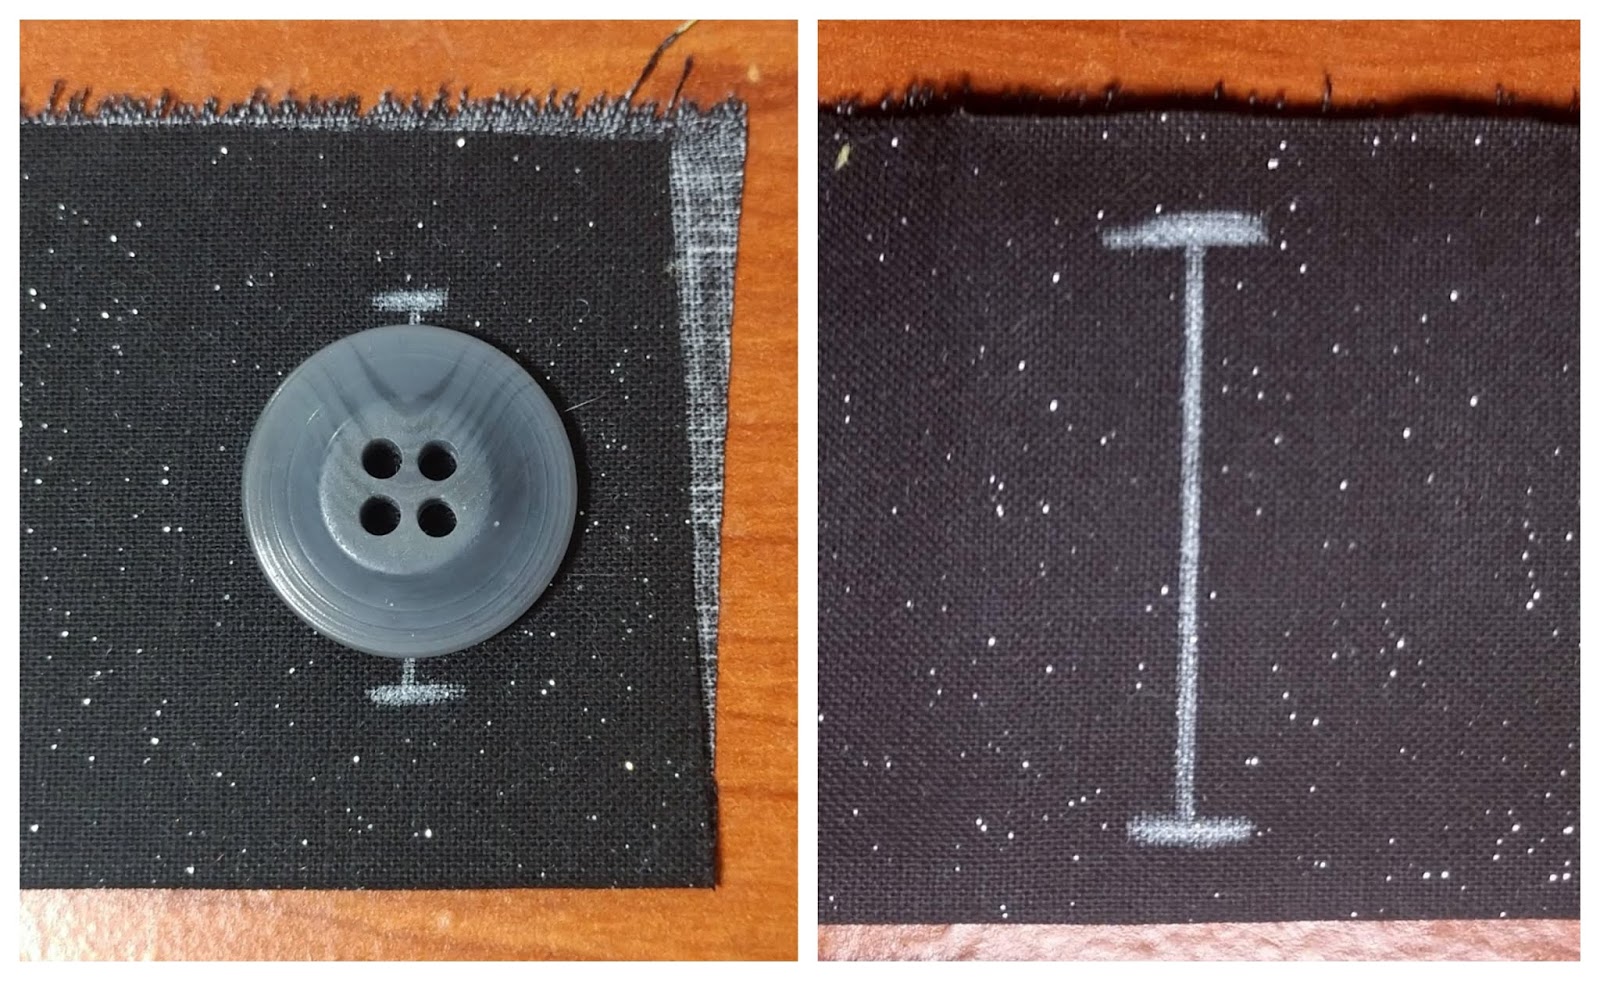
Place the button in the back section of the buttonhole foot and close it so that the button is snug. This is how long the buttonhole foot tells the machine to make the buttonhole.
With the presser foot lifter up, take off the presser foot that is on the machine by pressing foot release lever at the back. It should just fall right off.

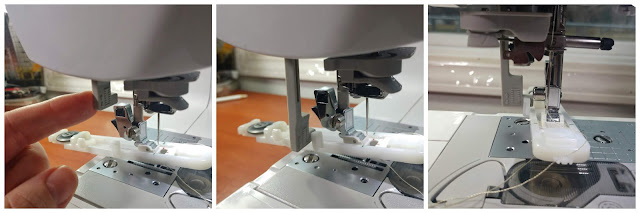
Press the release lever again and align the presser foot clamp with the little bar on the buttonhole foot and drop the presser foot lifter down until it latches onto the buttonhole foot.

The last step of attaching the buttonhole foot is the buttonhole lever. Pull down the buttonhole lever and it should sit between the two little tabs on the side of the buttonhole foot.

Select which buttonhole you need and you’re ready to start
Buttonhole Types
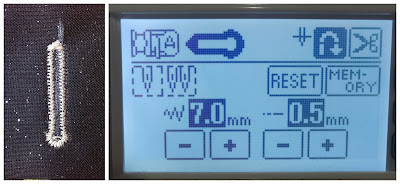
This is a basic Square buttonhole. It is used on medium to heavyweight fabric and can pretty much be used anywhere. It has bartacks on both ends and is perfect for stabilized fabrics.
Rounded buttonhole with a reinforced bartack is specifically used for horizontal buttonholes. This buttonhole is best on thick fabrics.
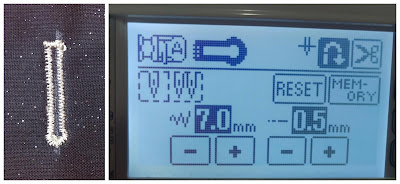
Rounded buttonhole. See how it’s rounded on both ends? That is for use on areas that are subject to more strain.

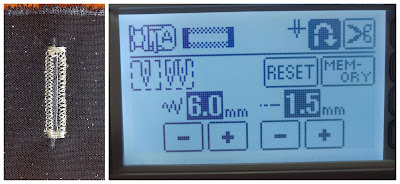
This is a keyhole buttonhole. It is best used on very heavy, thick or plush fabrics and with larger buttons. That little keyhole at the end allows for a little extra room for the big button to squeeze through.
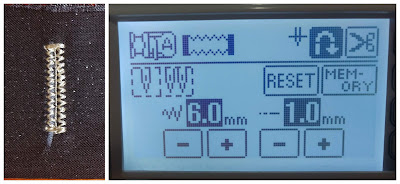
This keyhole buttonhole is pointed at one end, like the one above, it is for use on heavy, thick or plush fabrics that will have more strain put on them.

Here is a keyhole buttonhole with a reinforced bartack end. It is specifically used in horizontal buttonholes for heavy, thick or plush fabrics.

Next, we have some stretch buttonholes. They can also be used on woven fabrics for a more decorative looking buttonhole. This first one is specifically for use on stretchy fabric.

This stretch buttonhole is very pretty (in my opinion) and is perfect for knit buttonholes, or great for a decorative buttonhole. It would also work well for a corded buttonhole, but I don’t show how to do that more advanced kind of buttonhole in this tutorial.

One last buttonhole from my machine. I won’t be showing an example of this buttonhole either, but it is a bound buttonhole stitch. Basically, each buttonhole looks like a tiny little welt. The stitch is just a straight one and can easily be done without the help of the buttonhole foot, but using it helps to keep each buttonhole uniform when making a bound buttonhole. If you get the chance to look one of these up, they are super cool! And used mostly on coats.
These are not the only buttonholes types. There are a lot more out there! But we are trying to keep this simple and adding in complicated buttonholes is not keeping things simple. When you are ready for more advanced patterns with more advanced buttonholes we can talk, but until then, let’s just keep it simple!
1-Step Buttonhole
So, here we are, the fabric is marked and interfaced, the buttonhole foot is in place and we are brave enough to get started! Slide your fabric under the buttonhole foot and hold the thread to the side and out of the way.
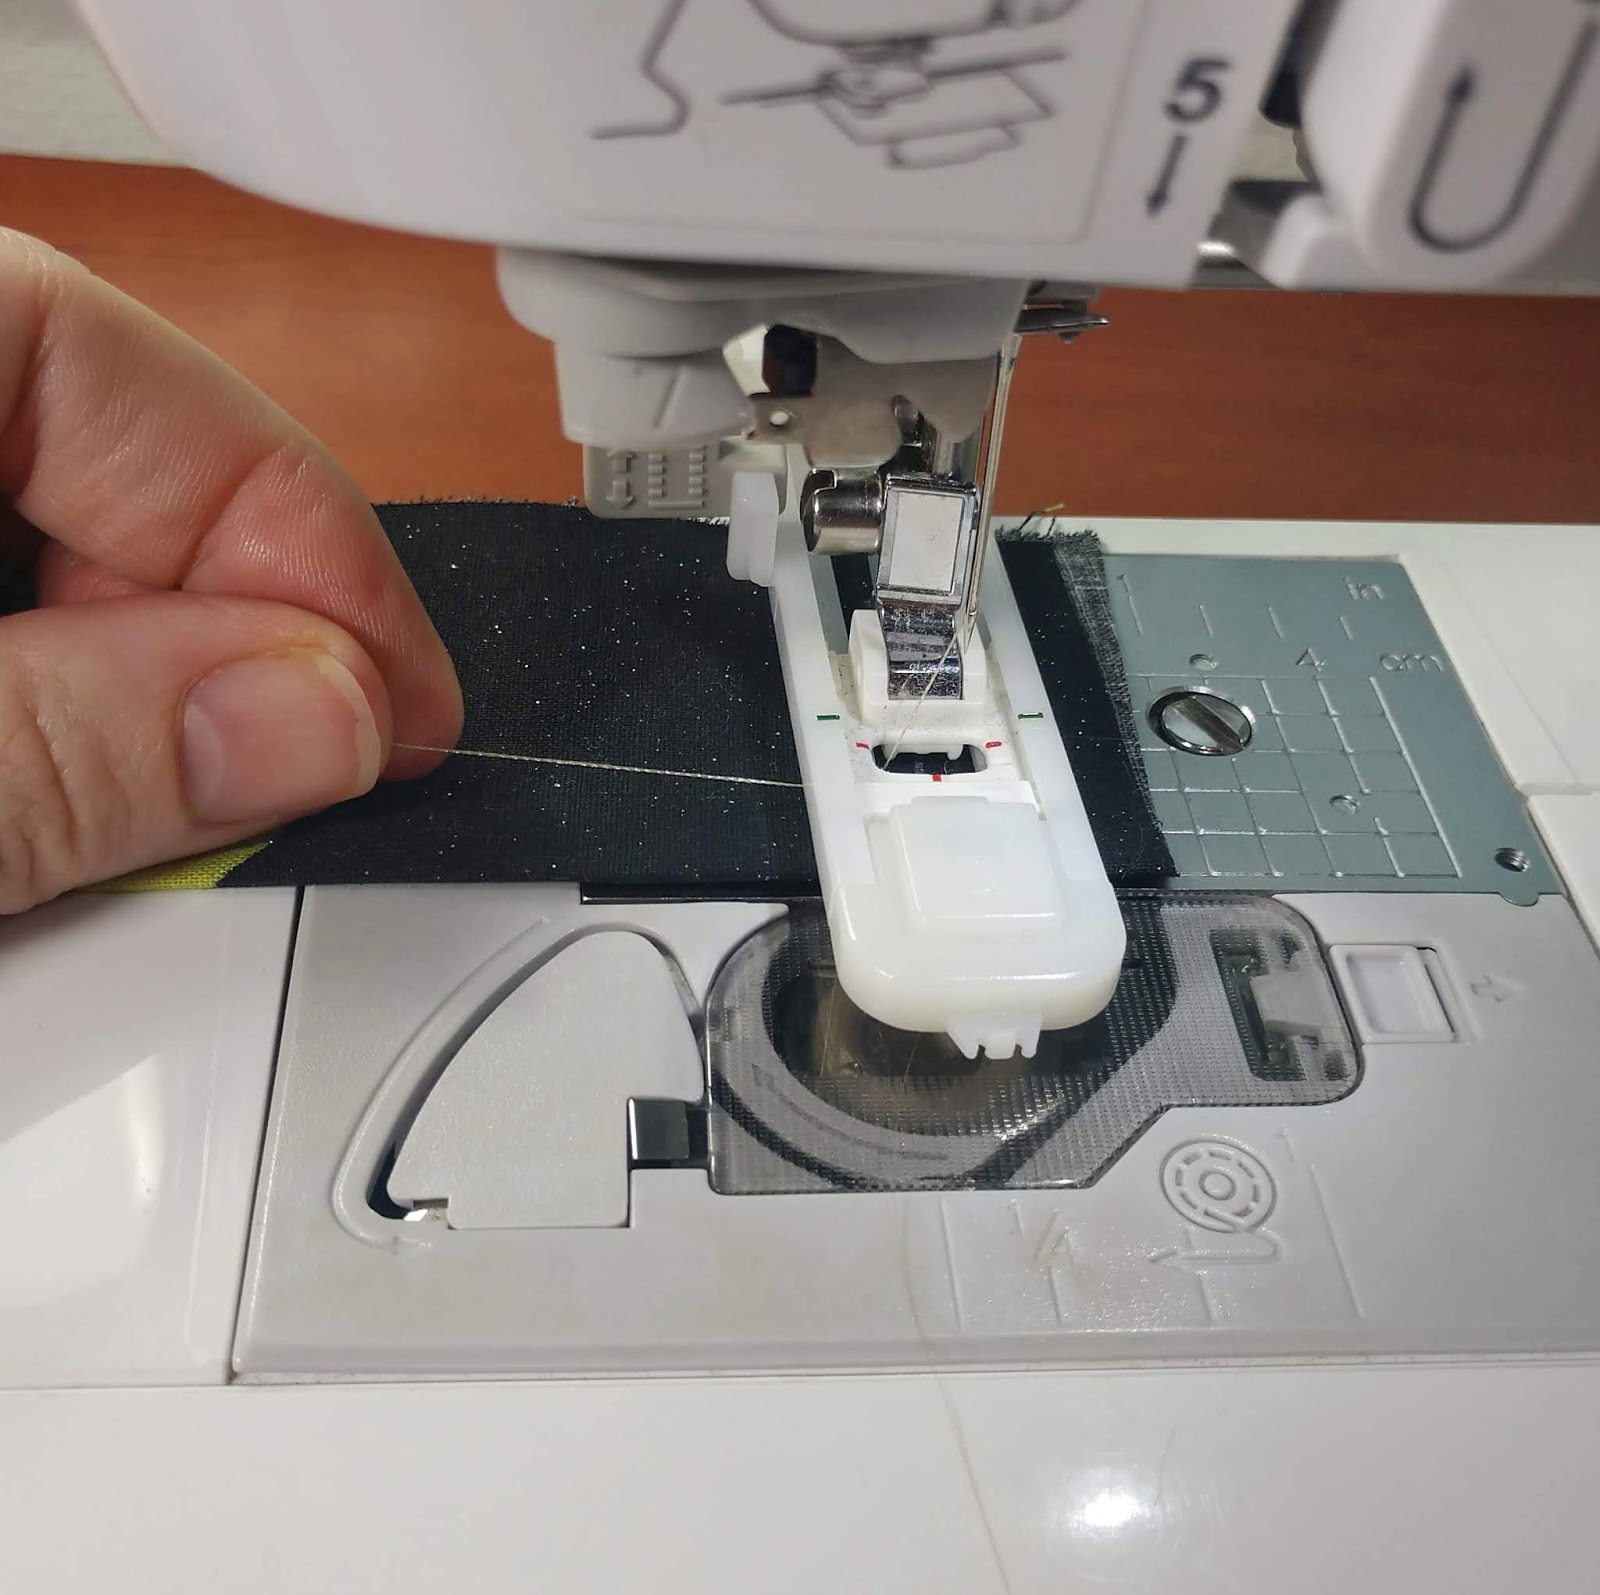
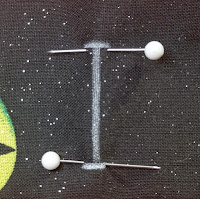
Line up your marks so that the top beam of the “I” is centered in the little hole of the buttonhole foot and the long center beam is running down the very center of the buttonhole foot. You are basically wanting to sew along both sides of the “I”. In this image, the buttonhole foot isn’t on the machine because I couldn’t get my camera in the machine to get the lines to show up properly.
Please note that the buttonhole foot is going to move backward first!! That’s right, the feed dogs are going to move the fabric towards you first and then away from you. This is going to feel backward, believe me, I have had to unpick a few buttonholes because I forget about this. But you will get used to it, eventually.
4-Step Buttonhole
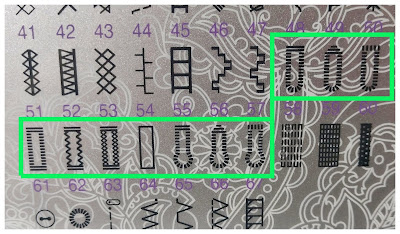
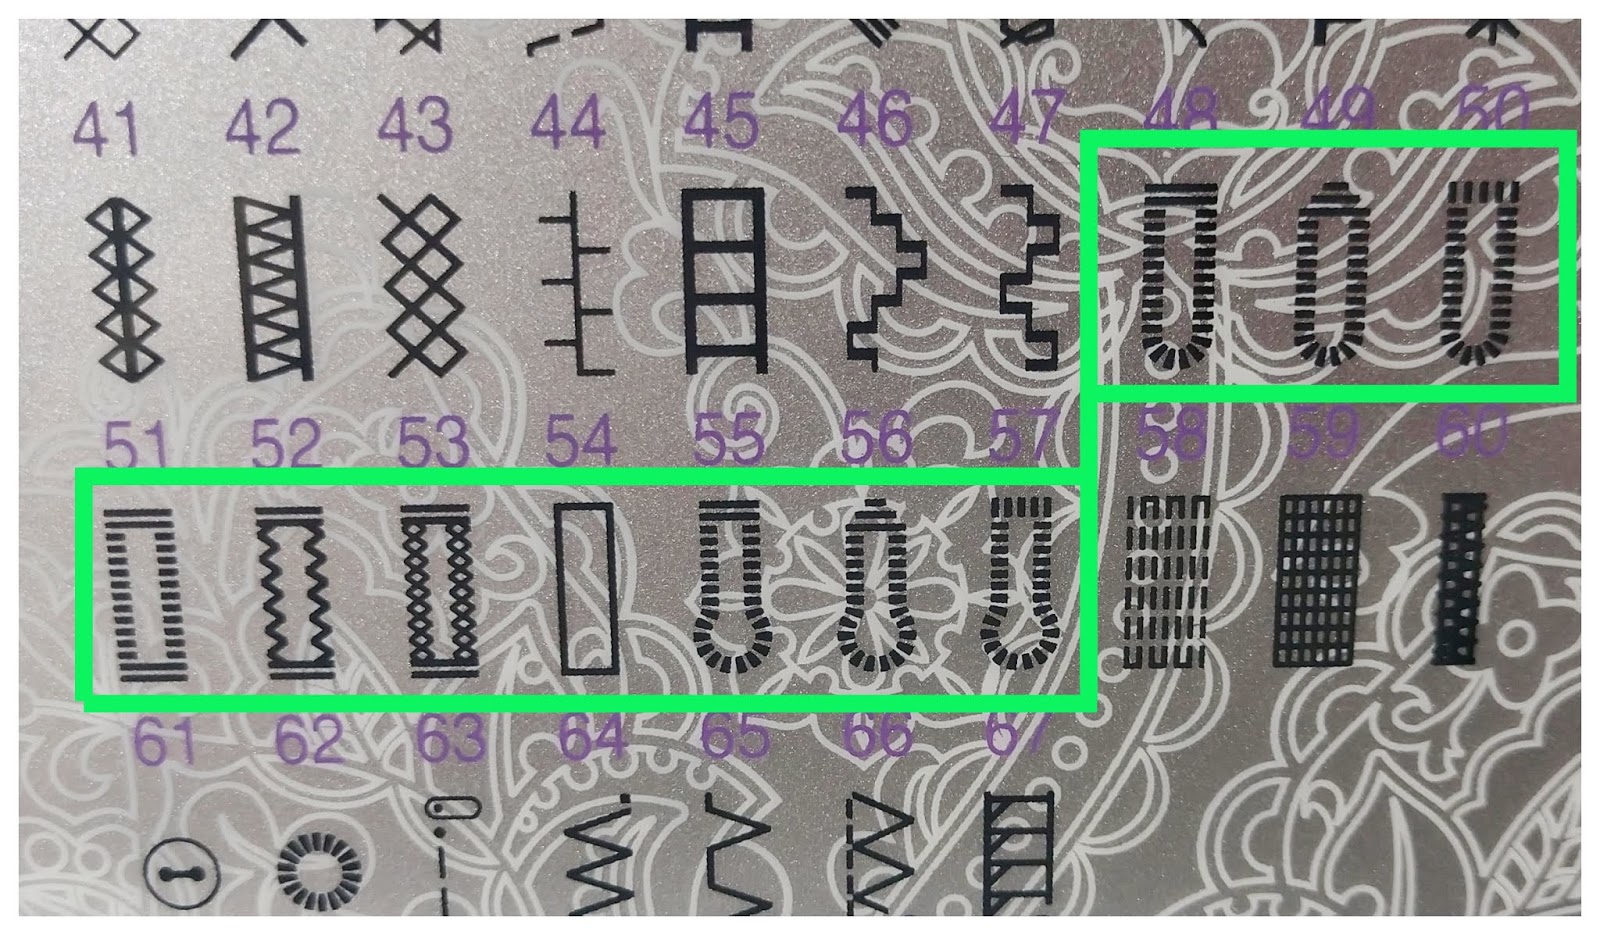
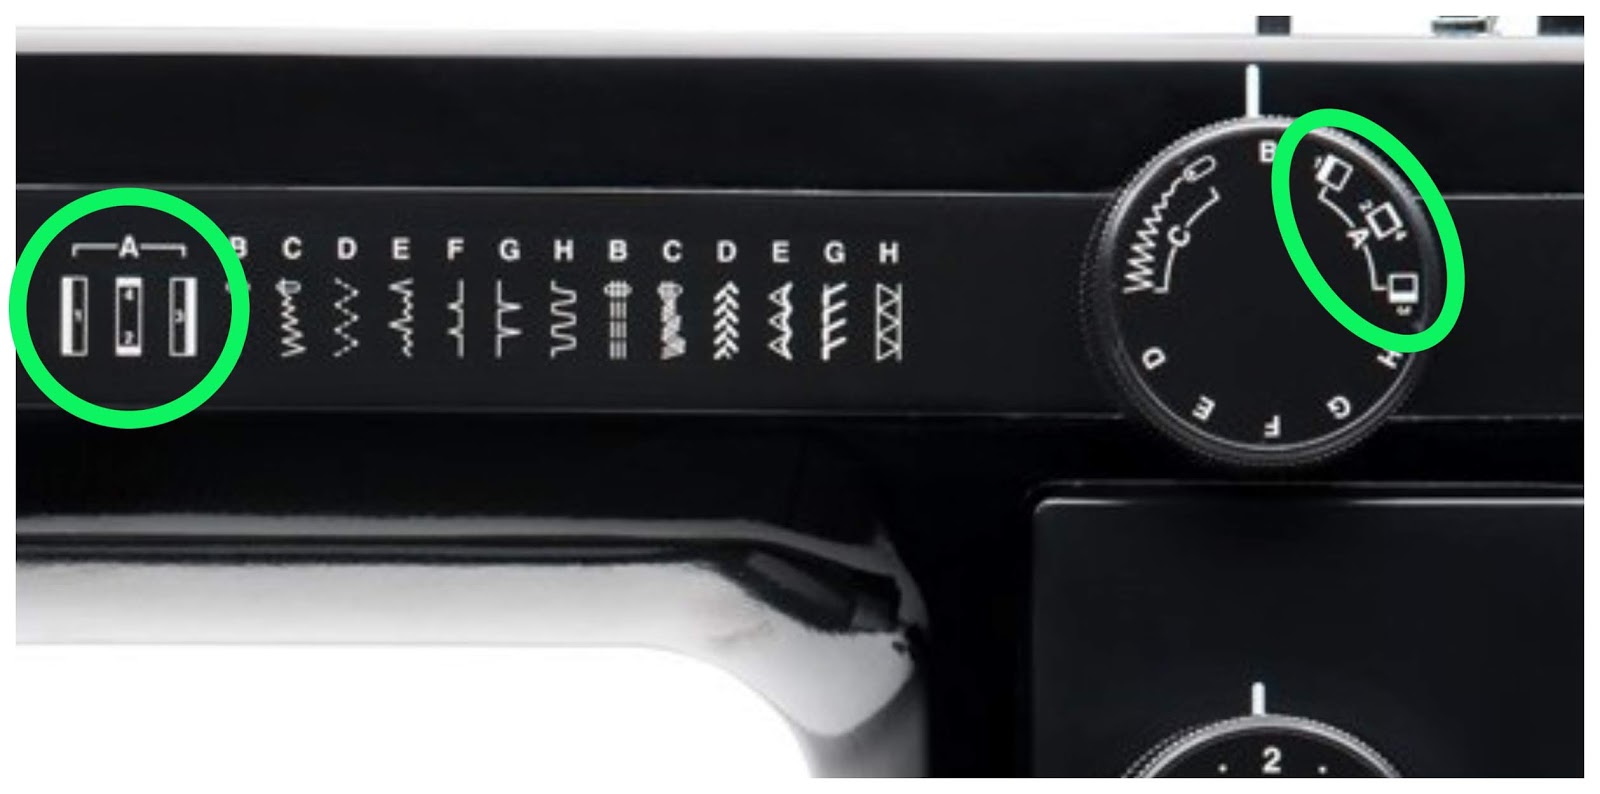 |
| Photo from Amazon green circles are mine. |
Unfortunately, neither of my machines has this kind of buttonhole and the only place I have even seen one done is on YouTube. And I have this very deeply ingrained fear of plagiarism (thank you BA in English) so I would rather turn you towards one of those great tutorials rather then parrot what they have said. I am not going to leave you with a link just in case Eunoia would like to come up with their own tutorial. Just know that you are basically going to get the exact same results you will just have to move your needle to have it in the correct place while sewing each of the 4 lines that will create the buttonhole. This does not look to be a complicated process, especially with good marking (see, it really does come in handy!), just practice several times before doing it on your actual garment.
Manual Buttonhole
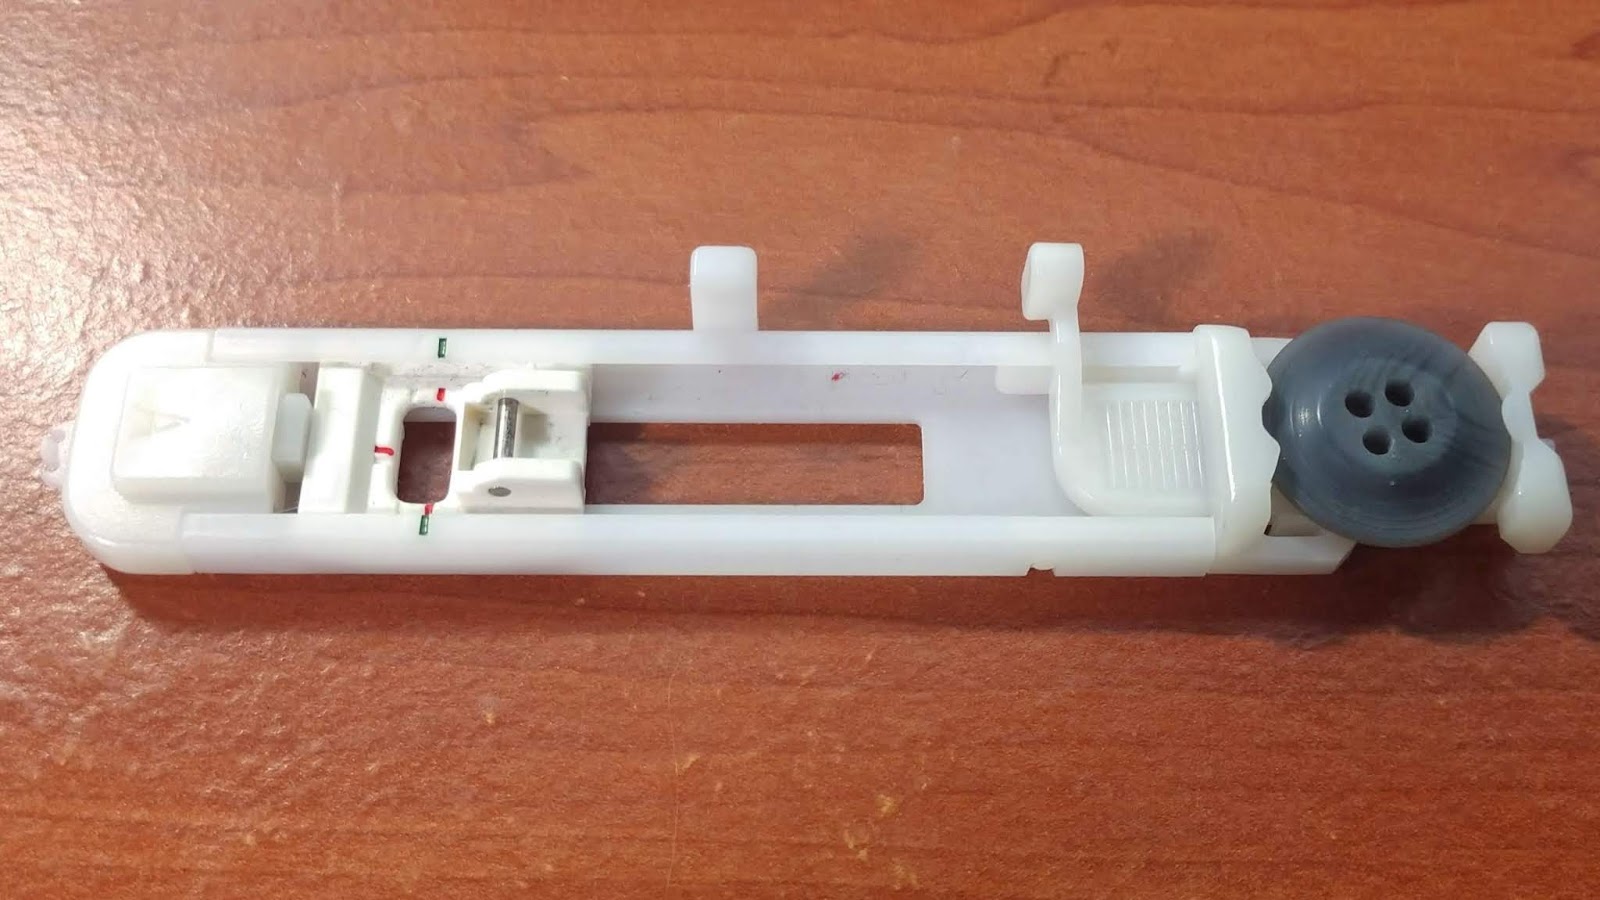
I have one last kind of buttonhole that can be sewn on a machine. It’s used in those times when your machine just doesn’t feel like sewing a buttonhole. Or for machines that don’t have buttonhole capabilities. Or when this happens: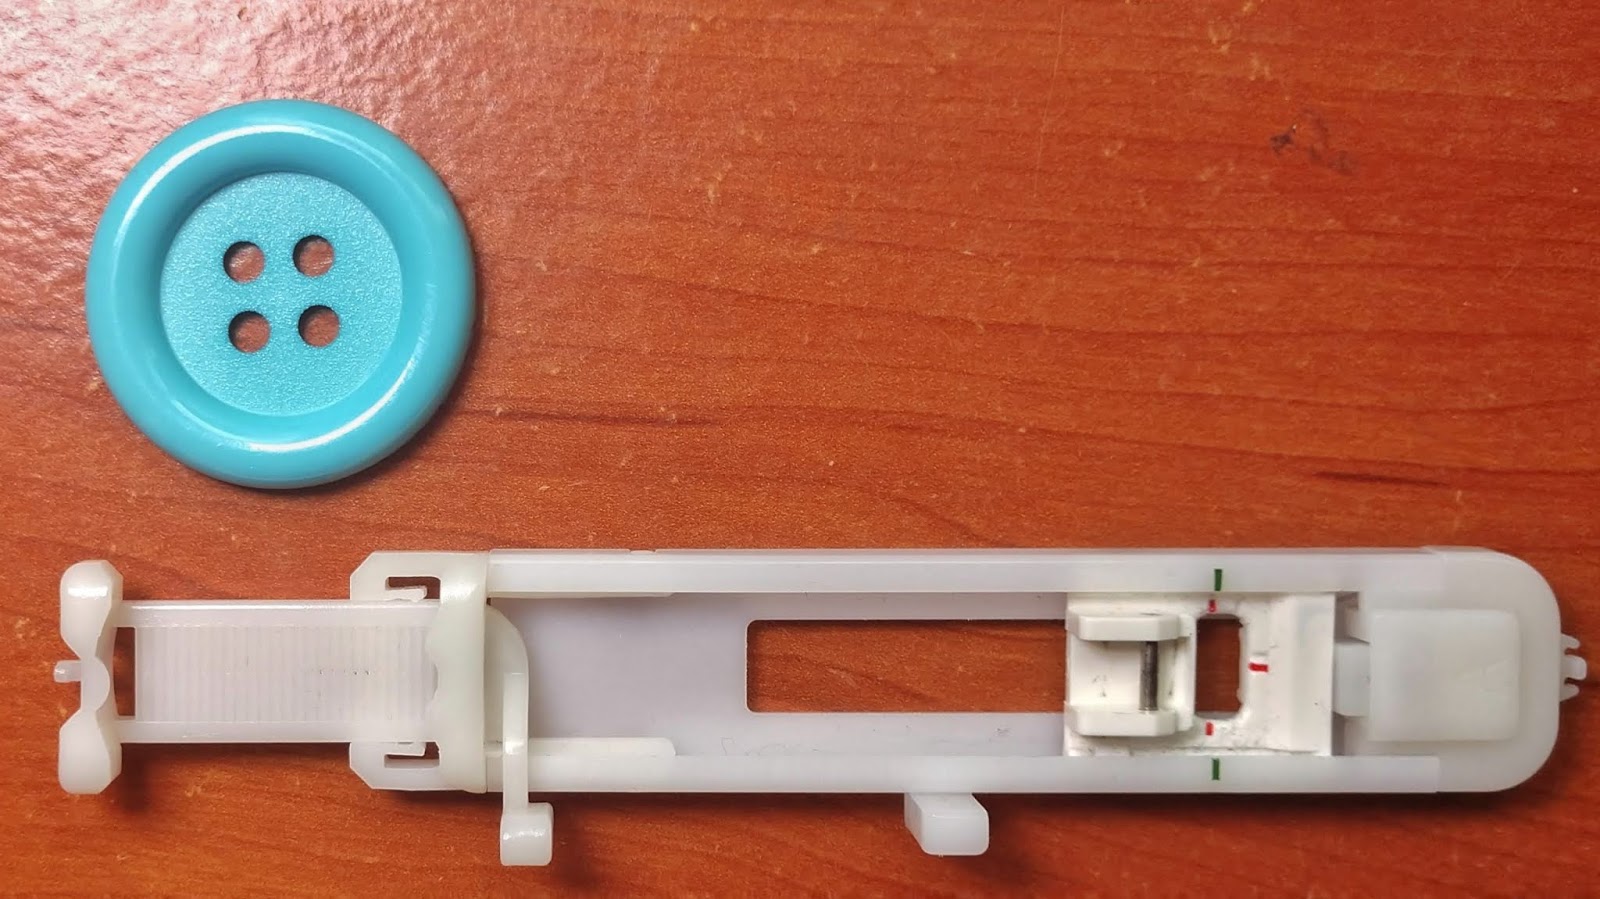
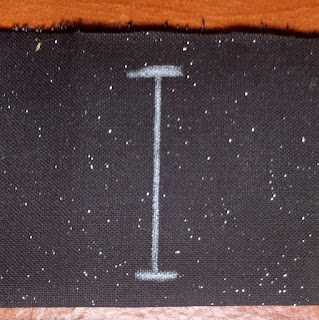
That button is NOT going to fit in that buttonhole foot. There is absolutely no way! But we aren’t going to give up hope. We now know how a buttonhole should look, so let’s just make one using the principles we’ve already learned. First step, make the fabric, whether you decide to adjust the spacing of your buttons is up to you. But you’ll need to mark your pattern so that the horizontal lines of the I shape can be seen on the outside of the button lip, or you can take your button size and add ¼ inch. I personally think just marking the outside of the button is easier.
Then draw a vertical line straight between the two lines.
Now you are going to run a straight stitch down either side of the drawn vertical line.
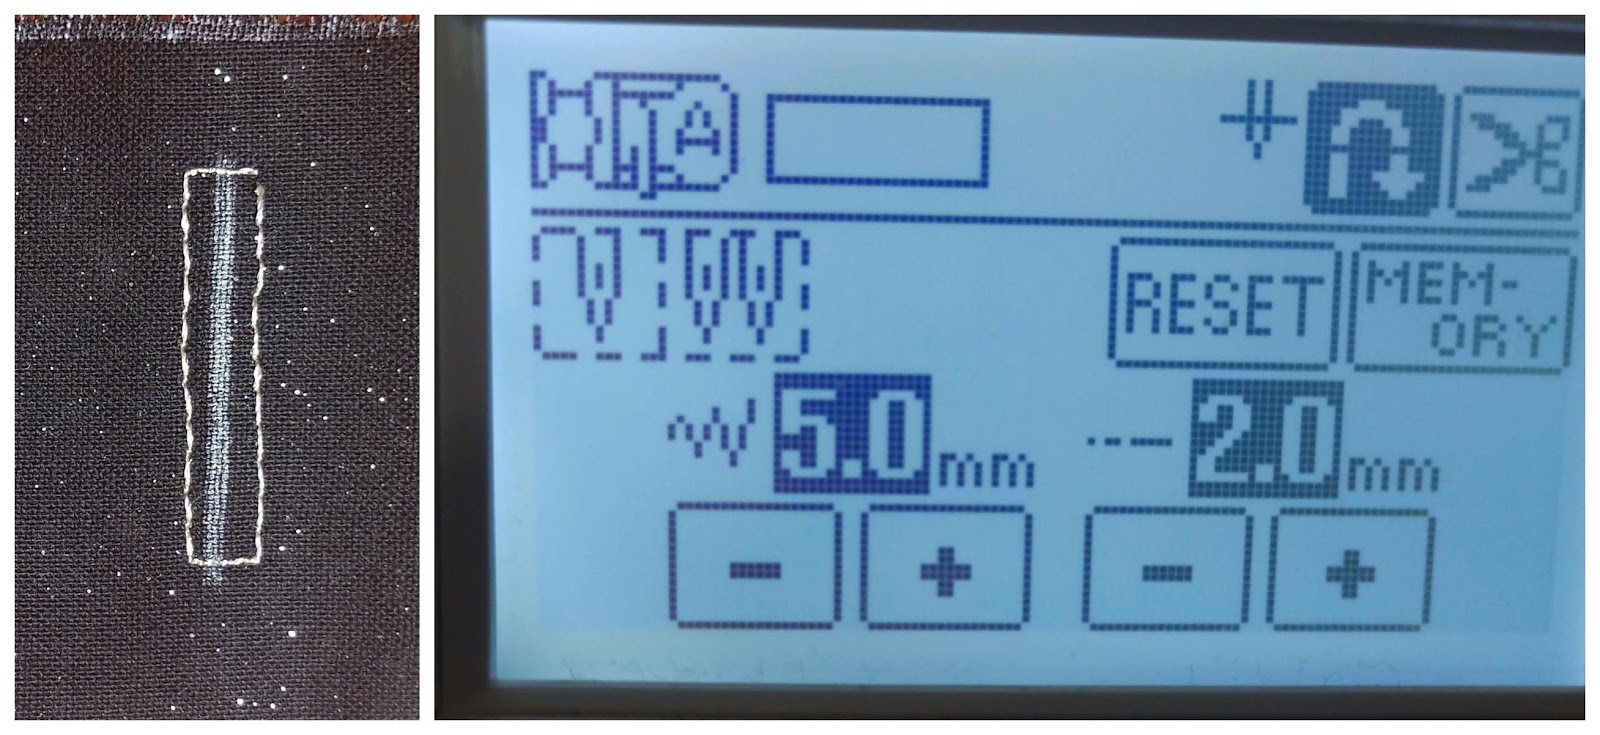
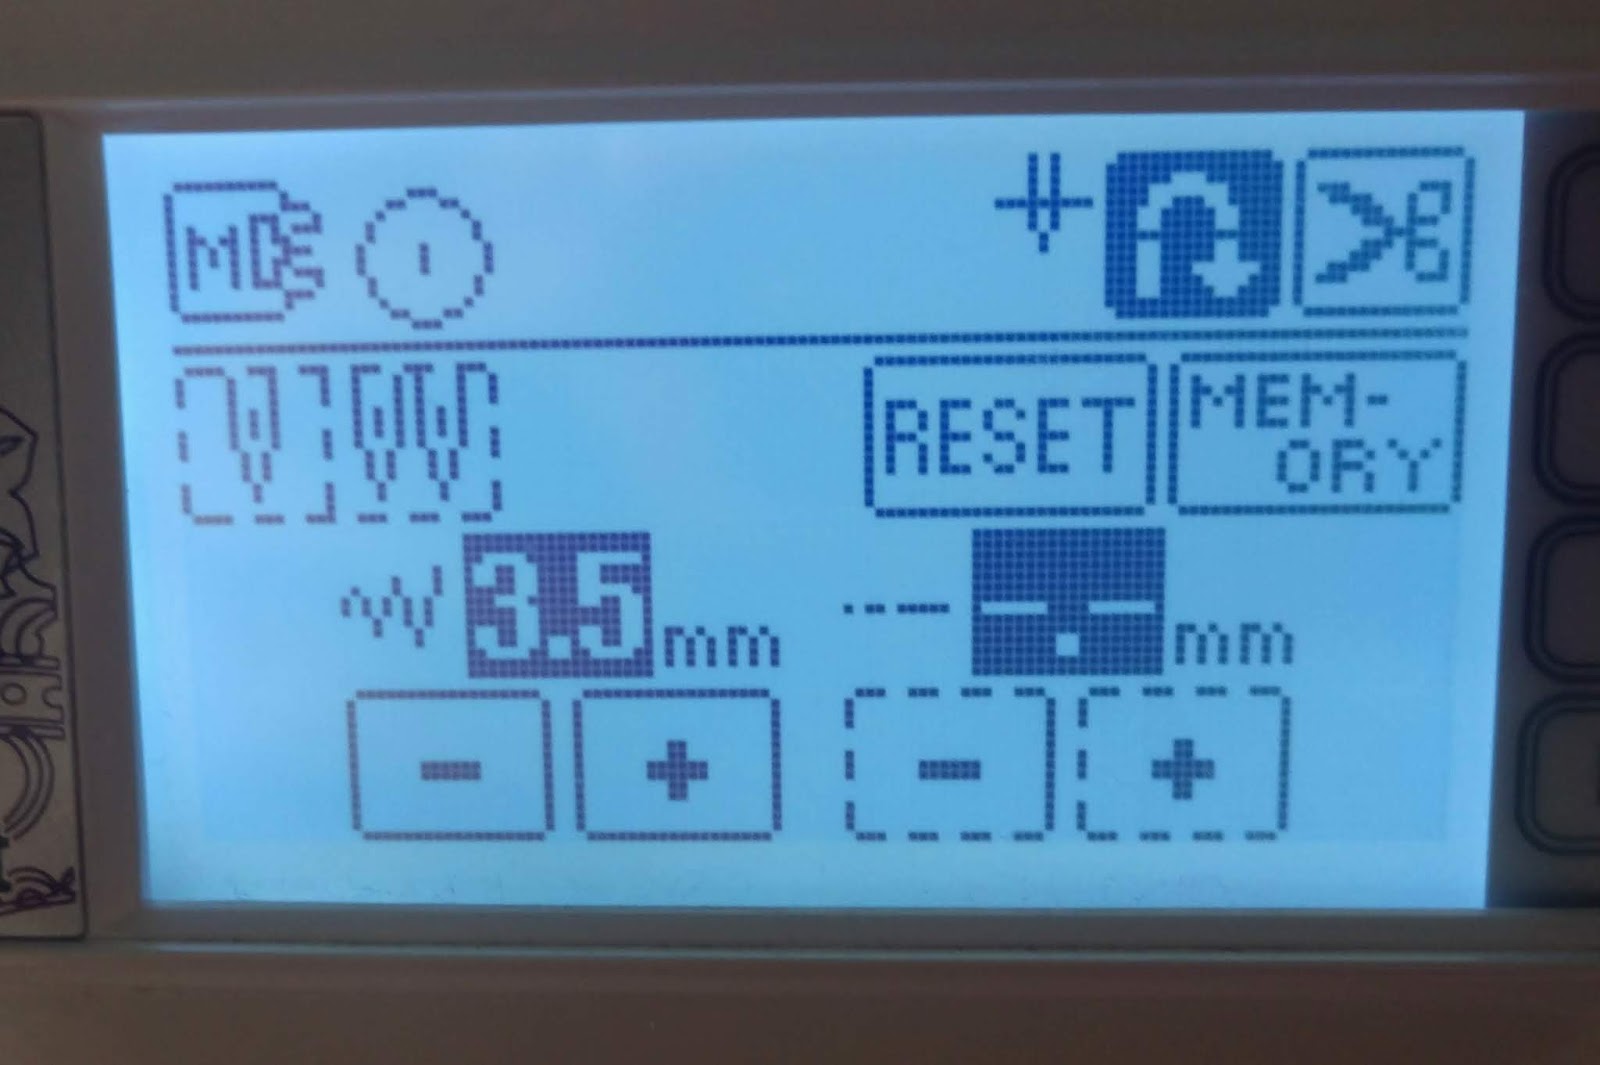
Now we are going to sew a bartack at the top and bottom, on the horizontal lines of the “I”. A bartack is a tight zigzag sewn just as a stable or secure point where there is lots of stress. You make a bartack by setting your zigzag stitch width at 5 mm and stitch length at 0mm.
You only need to do like 4 stitches and backstitch, or you can move on to the next step without backstitching or cutting your thread. You are going to then raise the needle on your machine, change the stitch width to 2 mm and the length to .4 mm and using the straight stitching you did before as a guide, zip zag from the top bartack to the bottom button marking. Then you will do the same as before, do a small batch stitch or just adjust your machine so that it will sew the bottom bartack in the correct placement across the bottom of the button marking. Adjust the width to be 5 mm and the length to be at 0 mm and stitch the bartack. You will then finish up the last side of the buttonhole just like the other, with a stitch width of 2 mm and length of .4 mm.
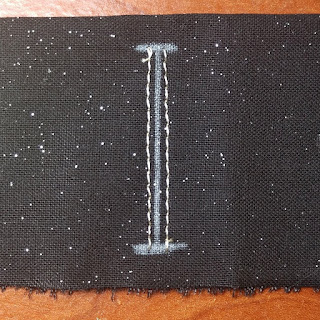
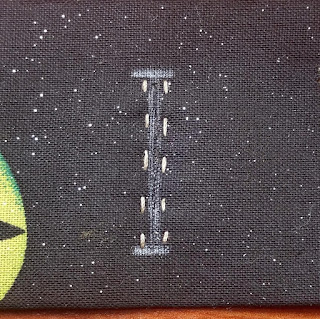
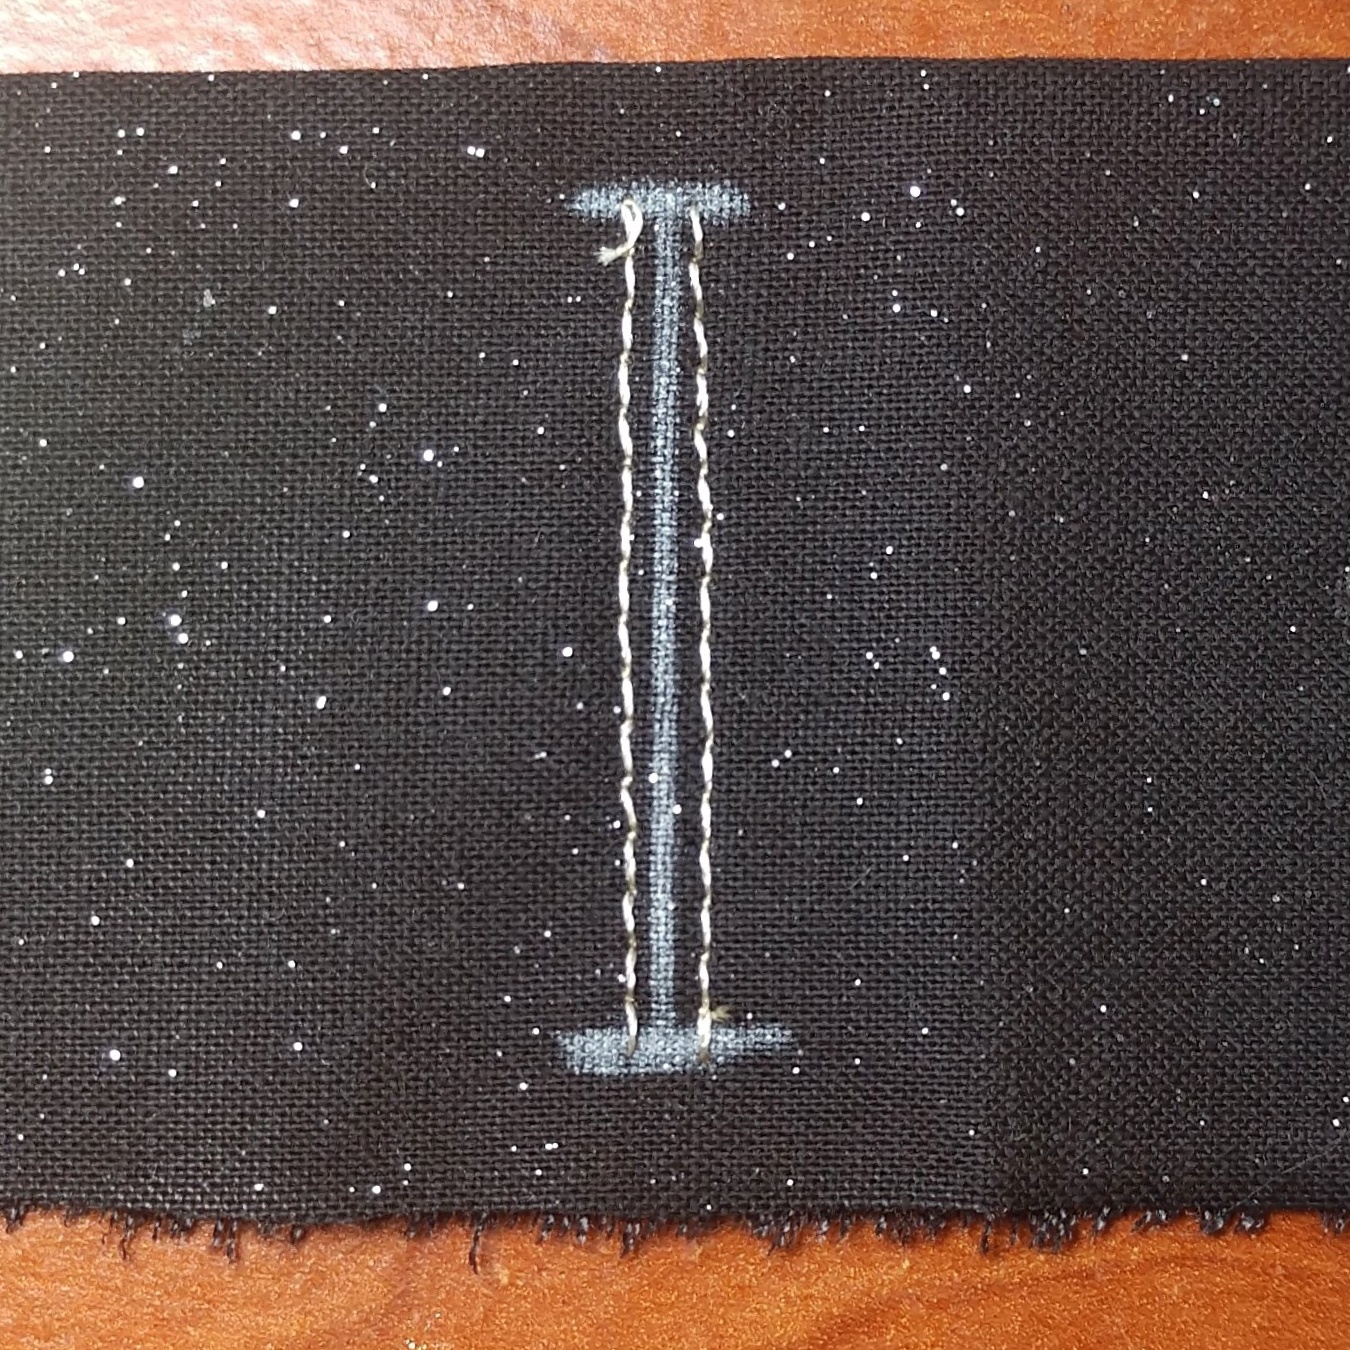
Your final results, once the strings are trimmed, should look something like this.
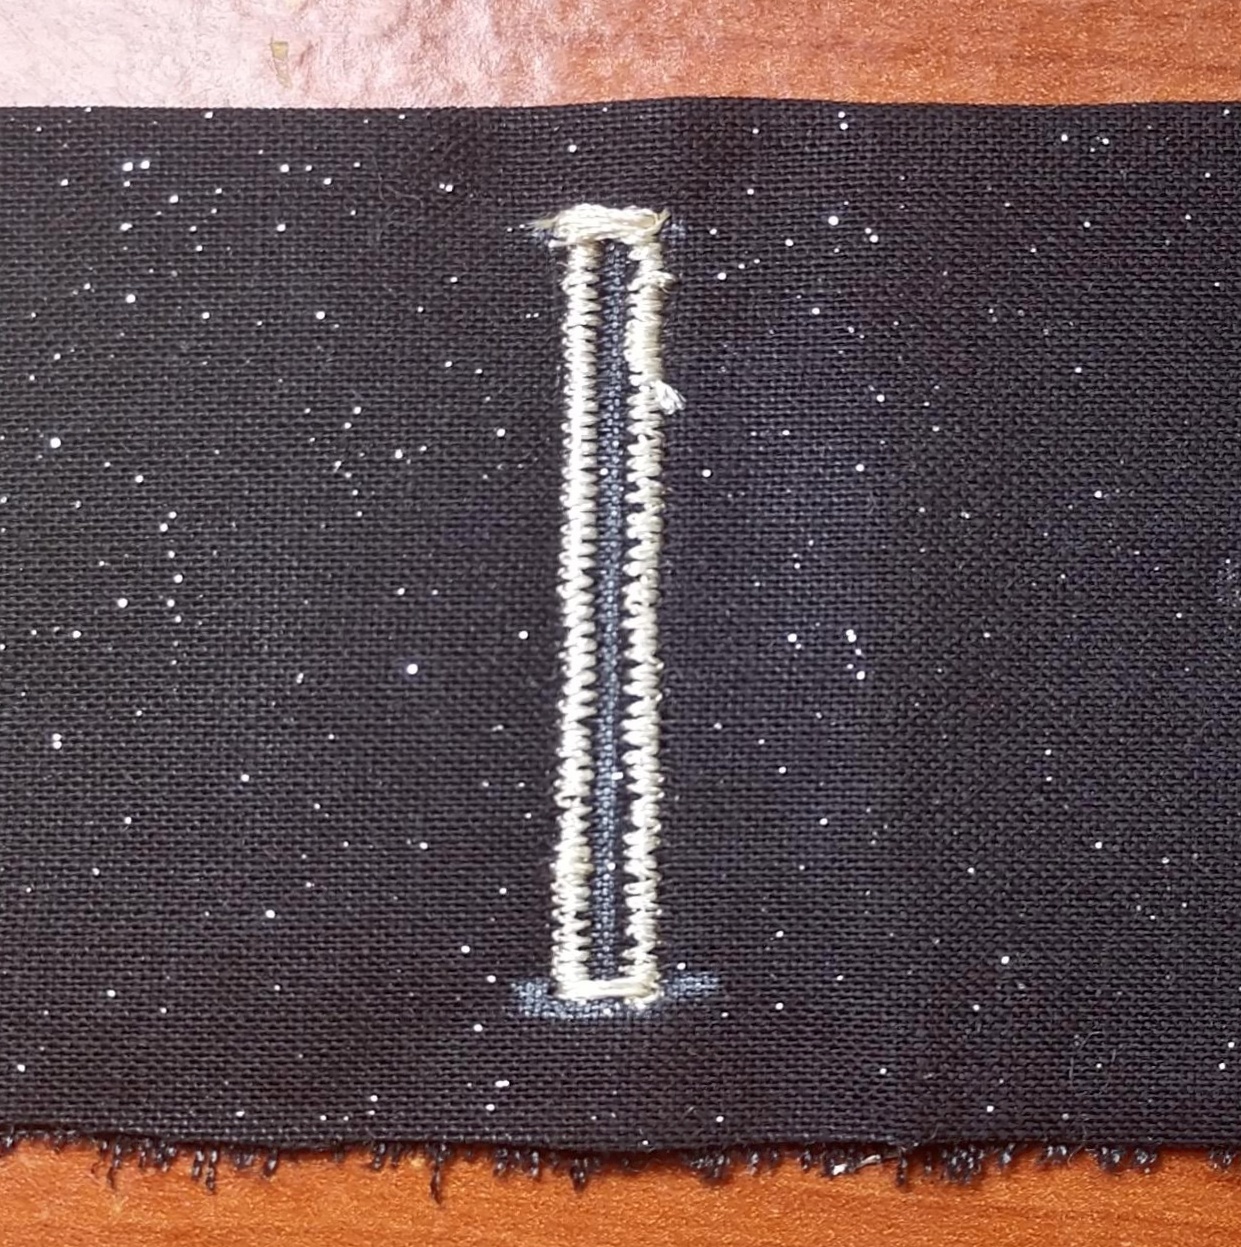
Don’t worry if it’s not perfect. Once a button is inside no one will be able to tell if it’s a little wonky, as long as it works!
Opening a Buttonhole
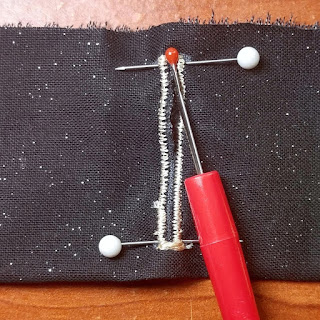
Speaking of working. Not a single button I have made yet is functional. There are no holes!! Let’s talk about that for a moment. There is only one way that I have ever put the hole in a button, and that’s with my seam ripper. There are special buttonhole cutting tools out there, that look somewhat like a chisel, but I’ve never used them.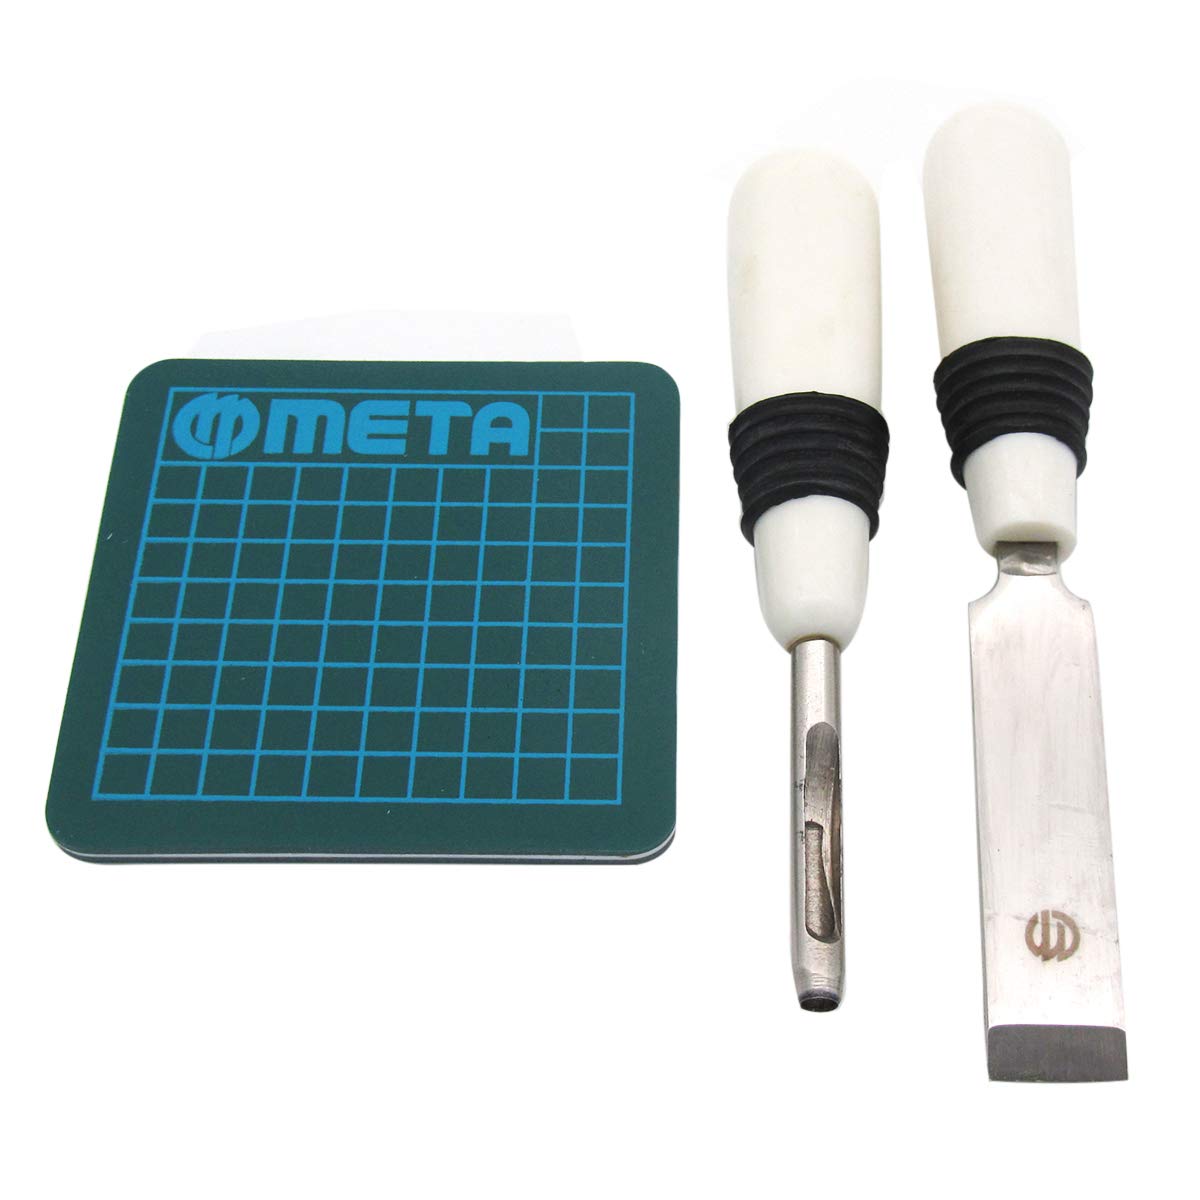 |
| Photo from Amazon. |
I think they look awesome if you are making lots and lots of buttons all the same size and shape. I haven’t found a need, or even desire to own this tool yet, but it’s kind of neat. I will probably still always use my trusty seam ripper and a few pins.
Why the pins, you ask? Well, you use the pins to stop yourself from ruining your lovely buttonhole that you’ve worked so hard to create. Let me show you!
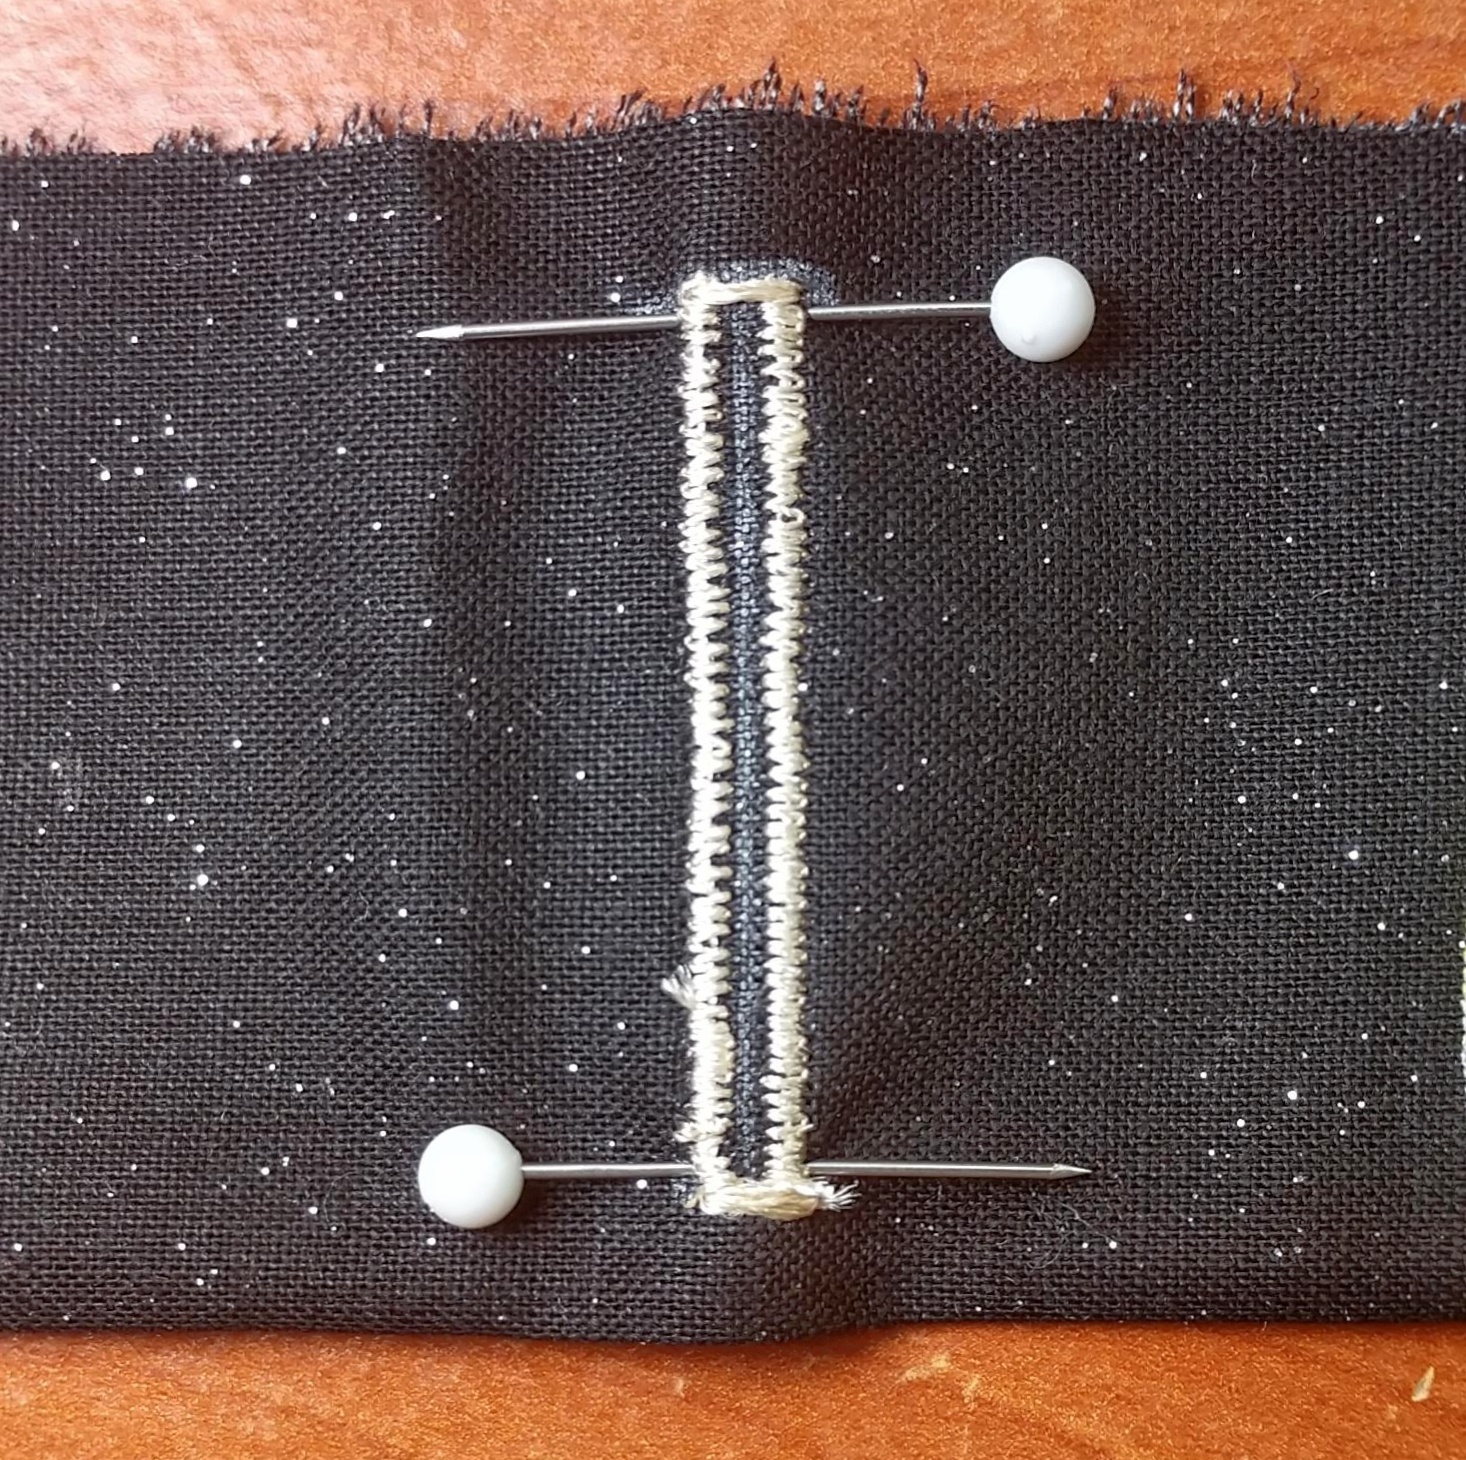
Put a pin on the insides of the bartack. This way then you slice the fabric between the pins will stop you from slicing the bartack.

And there we have it! A completed buttonhole! Yay!!

Hand Sewing a Buttonhole
But before I show you how to sew buttons, I have one last kind of buttonhole to show you. This one is a little more labor-intensive, but if you enjoy hand-sewing, you might find this one to be relaxing and enjoyable.
We are going to do things a little bit differently than with machine sewing a button. We are going to cut the hole first!
We are going to do things a little bit differently than with machine sewing a button. We are going to cut the hole first!
Use the same markings as a guideline. Put your pins in to stop from cutting the hole too large. And then cut the center beam on the “I.”

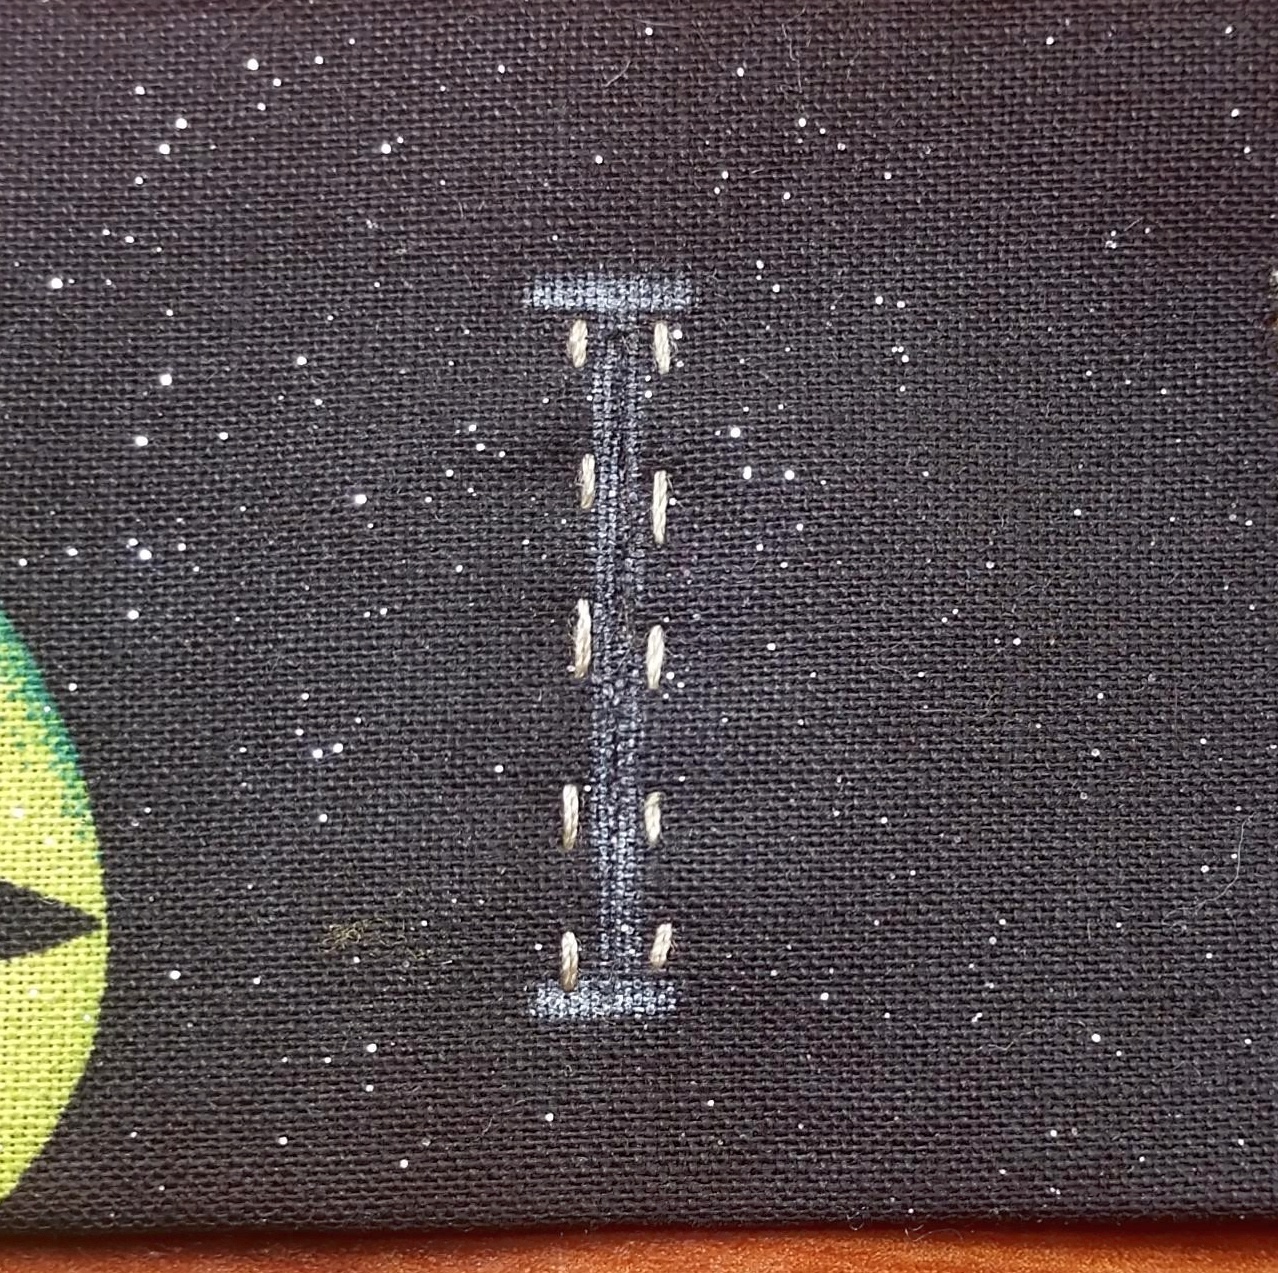
Get a needle and thread. Double it and tie a knot in the bottom. We start with a line of straight running stitches along either side of the hole, just like with the manual buttonhole with the machine. These stitches are more stability and really aren’t meant to be seen, so you can make them small and close to the hole.
Now you are going to stitch around the buttonhole from the inside of the hole to the outside. You can use whatever stitch you want but I’m going to attempt to use a blanket stitch to give it that little ridge around the edge.
Please don’t laugh so hard that you hurt yourself with this next photo. My blanket stitch went a little crazy on me on the one side. Its a really good thing this one is just for an example and not going on an actual garment, I would be unpicking it so fast!
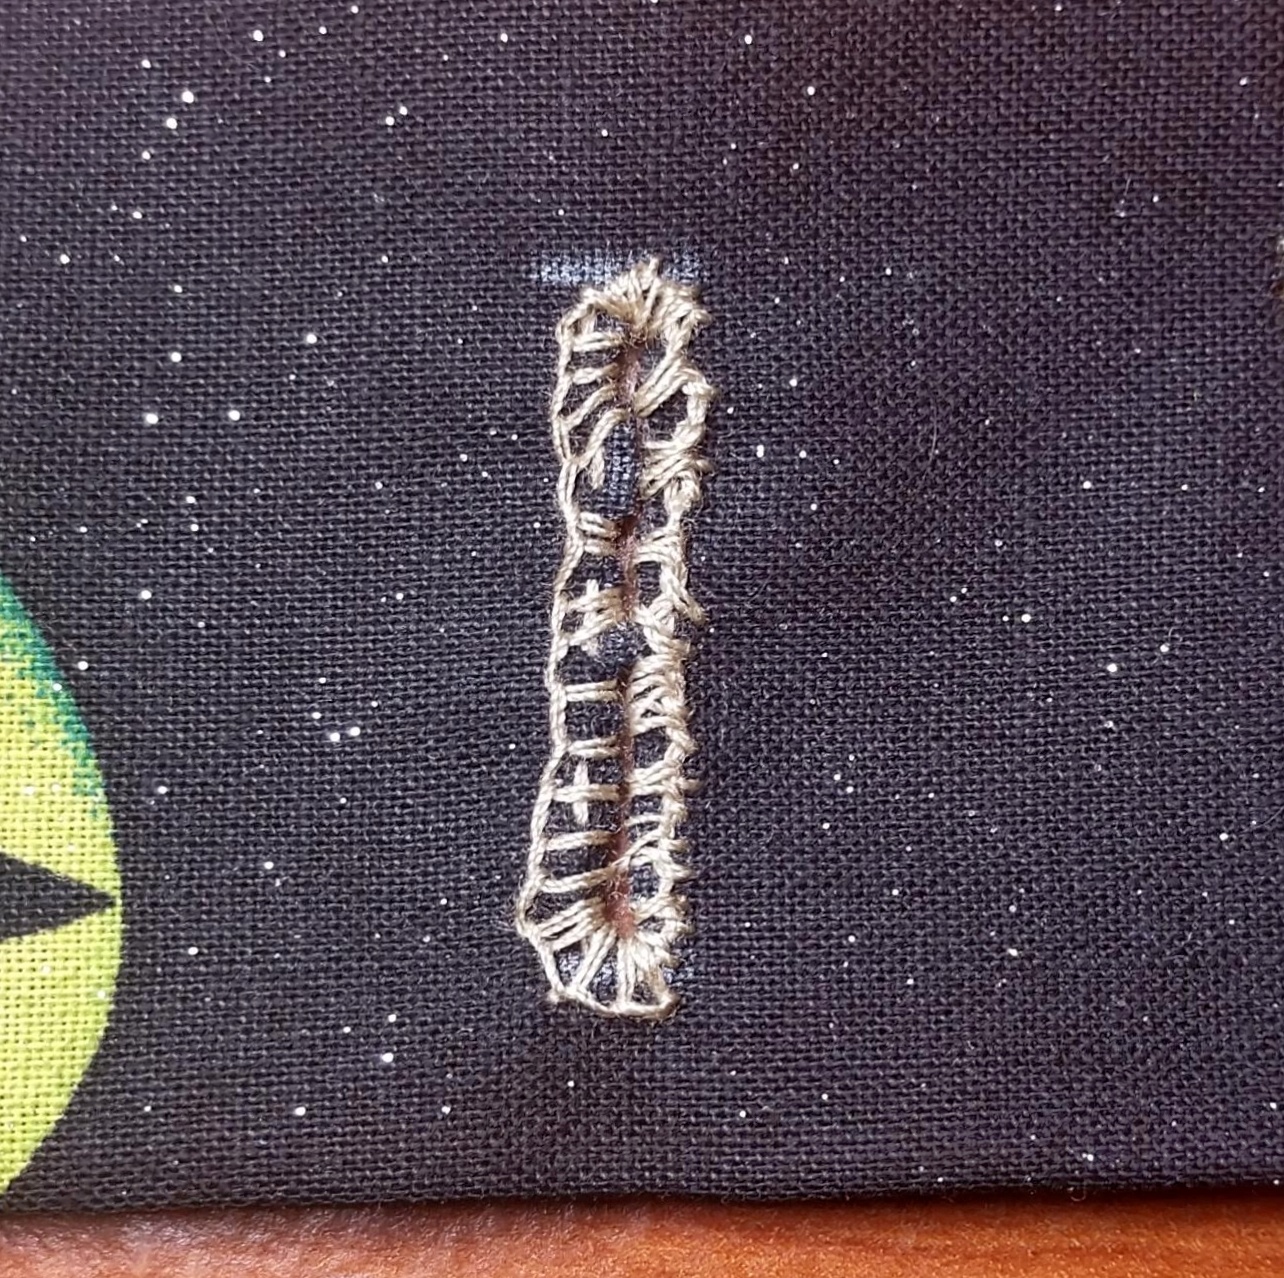
If you use a bit thicker thread, like part of an embroidery floss or actual button thread, it will be thicker and look nicer, as well as hold up to the stress of buttons a lot better.
Now we just need to attach a few buttons and we are finally good to go!
Machine Button Sewing
This is my button foot.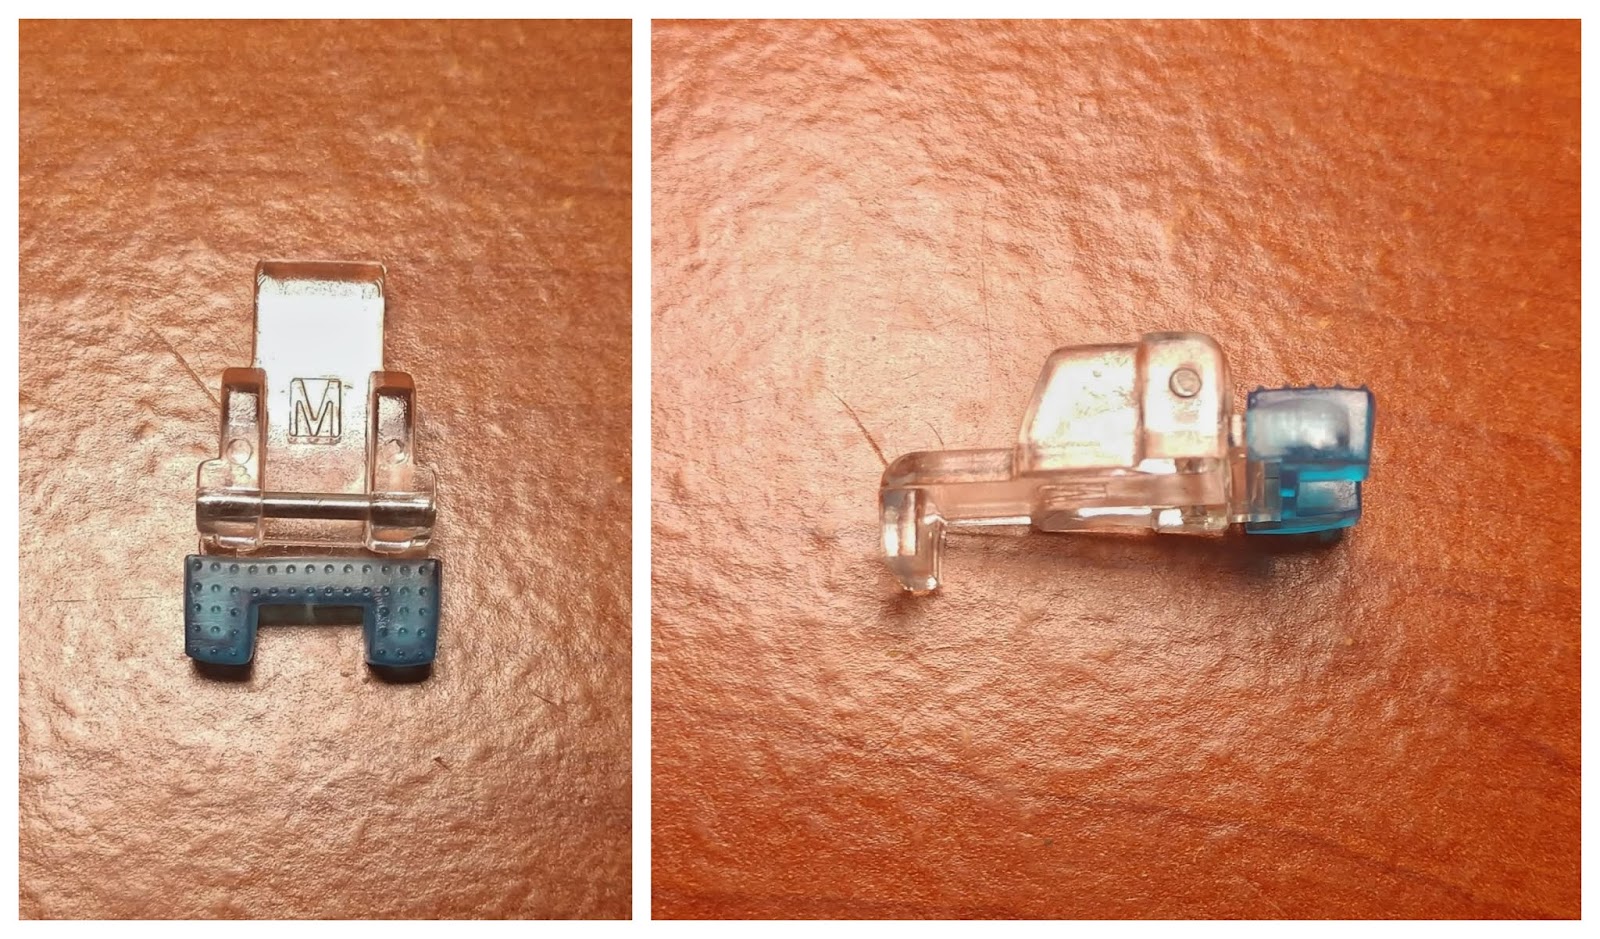
This is my button sewing selection. Not all machines have this option, but for those that do, I want to show you this, because it’s so cool!
The first thing I’m going to do is put the button stitch foot on my machine and then drop my feed dogs with this switch on the back of my machine. Please check your manual for the exact way to do this.
Now, to be completely honest, I have done this stitch with the feed dogs still engaged and my buttons came out just fine, but I have to suggest that you do as I say and not as I do on this one, because I don’t know what could happen if we don’t follow the directions. Let’s try to be safe rather than sorry.
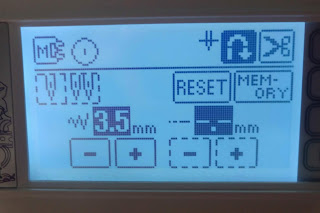
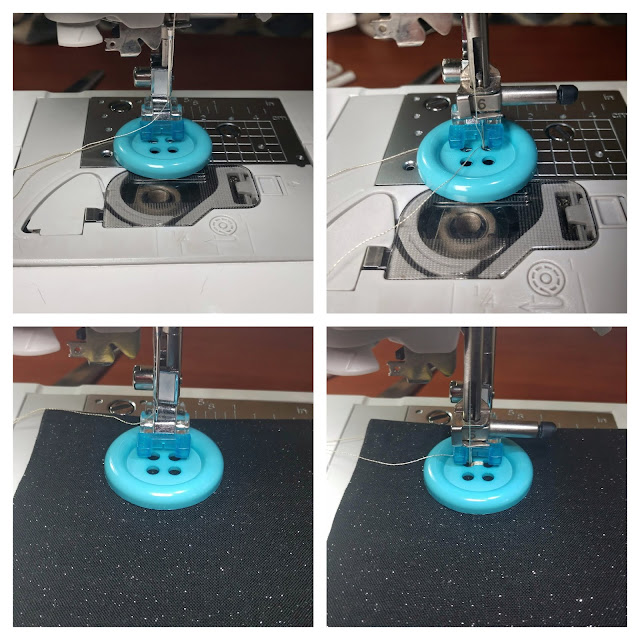
You are going to adjust the stitch width so that the needle will fall inside the holes when you sew. I like to do this by putting the button in place and use the hand crank to put the button up and down while adjusting to make sure I’m not hitting any edges.
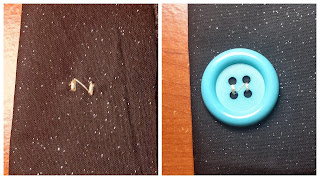
When I’m pretty sure I’ve got it right I put the fabric in place with the button in the correct location and press on the presser foot and it goes! If you are using a 2 hole button you are nearly done. If you are using a 4 hole button you need to shift your button and sew it one more time. Then lift out the needle and pull out the threads. If you have an automatic thread cutter, DO NOT use it! You need your threads long to knot them in place. If you take the two long threads on the back of the fabric and tug on them just a little you will begin to bring the upper threads down. I don’t have a photo of this because it was really hard to see, to begin with, and I’m not sure a photo would help much. But you will eventually have all 4 threads, upper and lower on the bottom of the button/fabric. Tie them together, once for each side and make a knot then you can trim the threads and you’re done!

Hand Sewing Buttons
Not all buttons can be sewn on with a machine. And not all machines can sew on buttons! So knowing how to correctly sew a button on is an important skill. Let’s go over it.
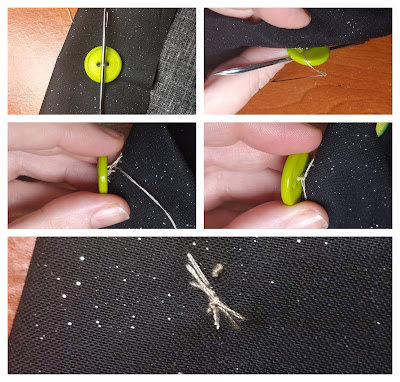
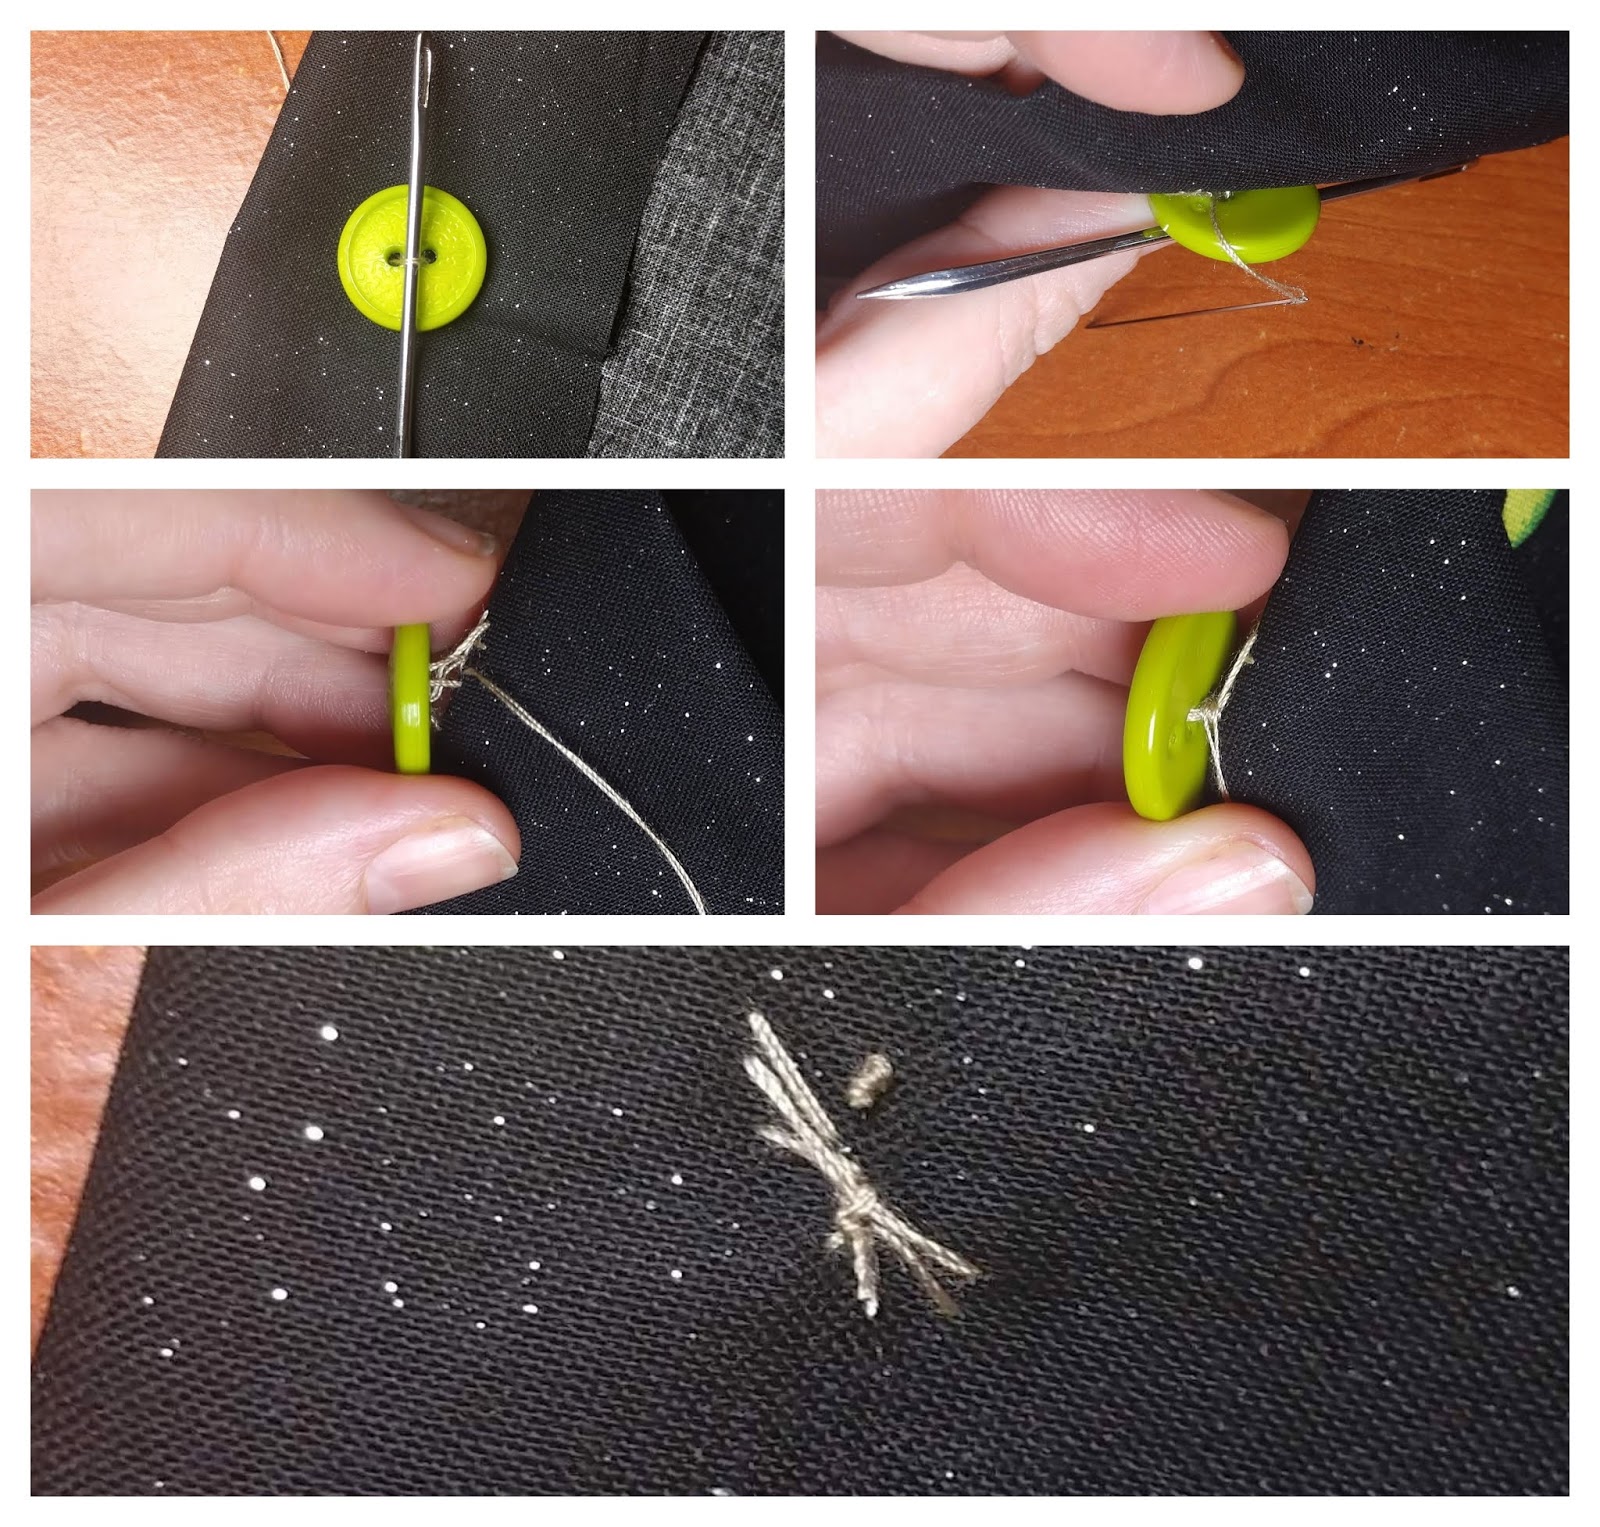
First, let’s sew a shank button because you can’t machine sew a shank at all. You are going to line up your shank with the X button placement mark and starting from the bottom of the fabric go up and through the shank and then back into the button, near the place where the needle came up. Repeat 3 times, unless you’re paranoid like me, then you might repeat 6 times, but I don’t think that actually makes it better. Then with the needle on the bottom, you are going to under and around the stitching 3 times. Then tie a knot and you’re done!
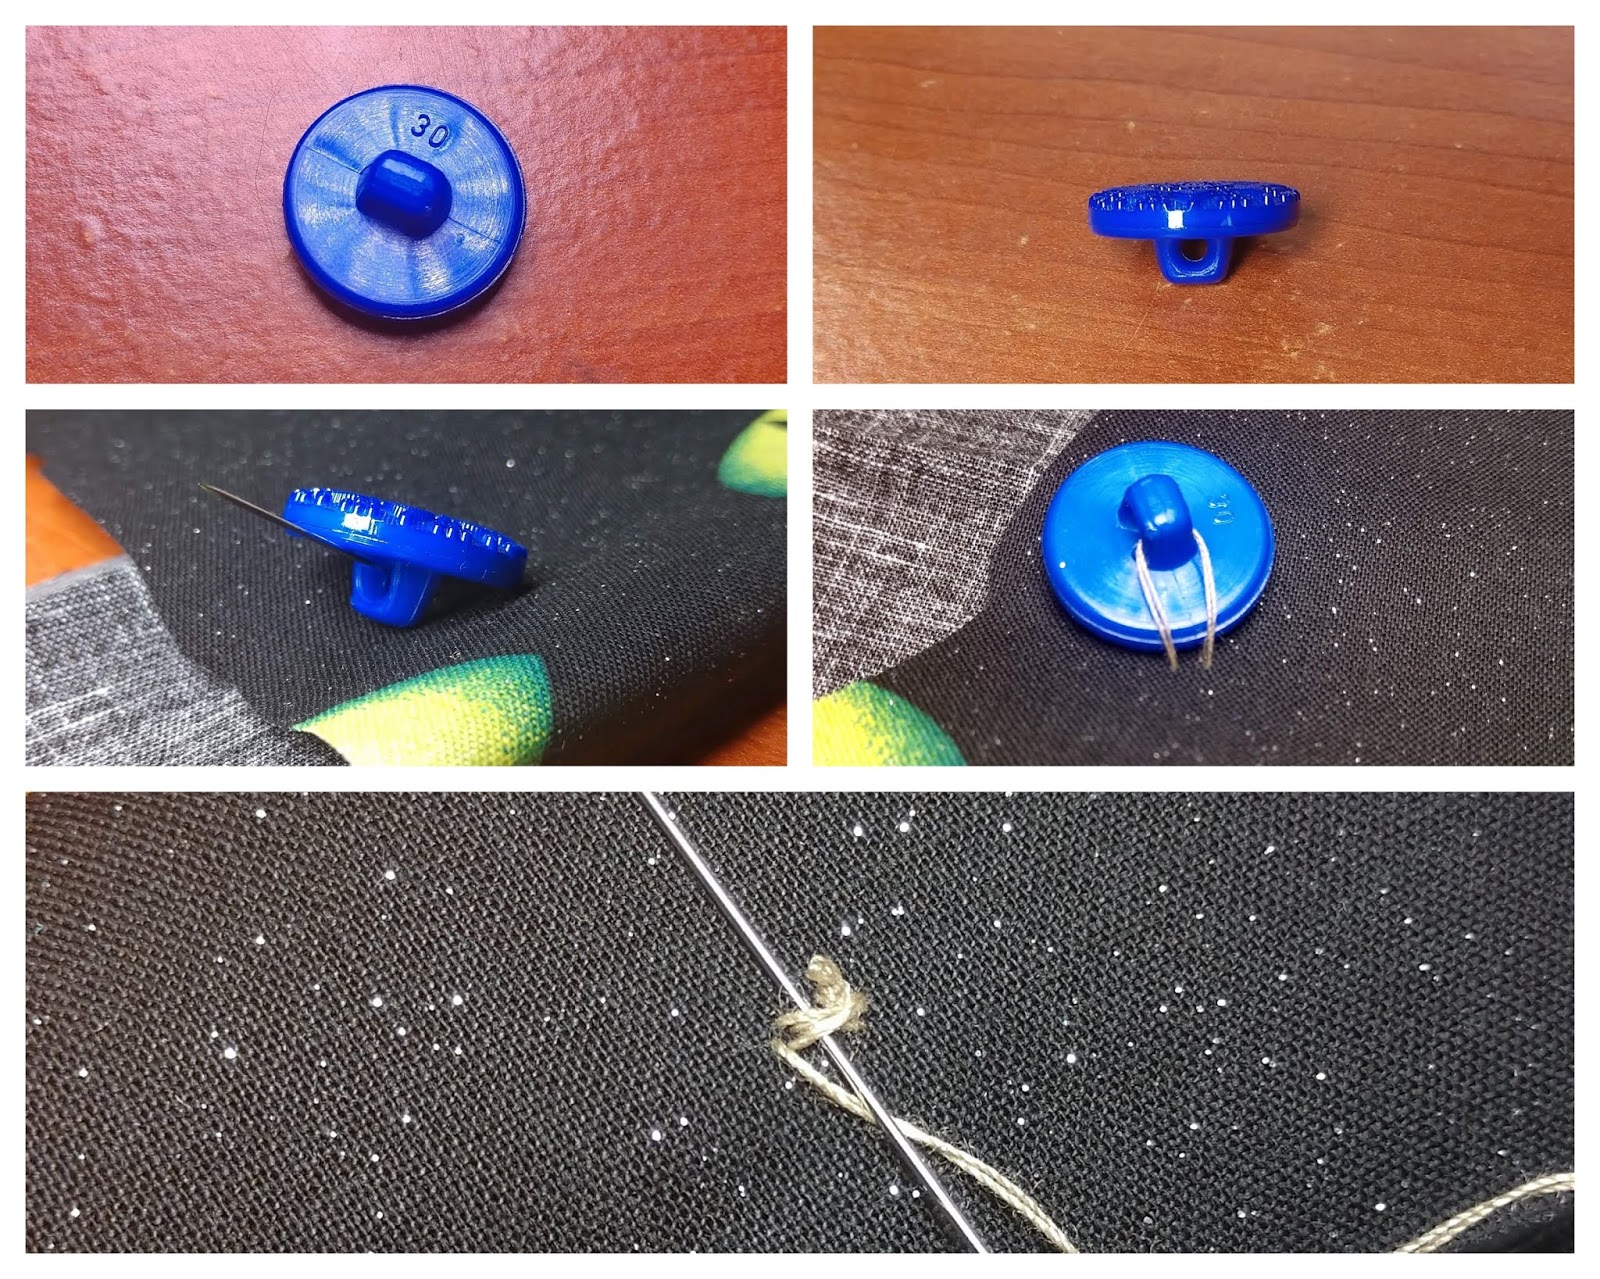
Last but not least, we have 2 and 4 hole buttons. They will actually be sewn exactly the same way, only one will have more stitches than the other.
First, start by putting an X of thread where the X button placement mark is on the pattern. This is the anchor point for the button. It will help reinforce the fabric the button is on and the thread, so it is more firmly attached to the fabric and should help it stay on better. Then you are going to make your first stitch into the button from underneath. Before you pull your thread tight on that first stitch, put down a space holder between the thread and the button. I am using a sail needle, but you can use a toothpick or another needle or something similar. Now stitch the button on 3 times. 6 times, 3 in each set of holes if you have a 4 hole button. Once you have gone through the third time it is time to create a “shank” of thread by going back up through the fabric but not through the any of the buttons holes, remove the sail needle and pull up on the button, so that the slack that the sail needle created is now on the bottom side of the button. Wrap the thread around the slack 6 times and then tie the thread off on the underside of the fabric. And with some practice and determination, the underside of your buttons will look a whole lot better than mine!
Oh, my friends! That was a lot to sit through. I am super impressed that you have made it this far! Thank you for joining me on this journey through buttonholes and their many creations and buttons and their fun! I have a deep love for buttons and a collection that rivals my mother’s!
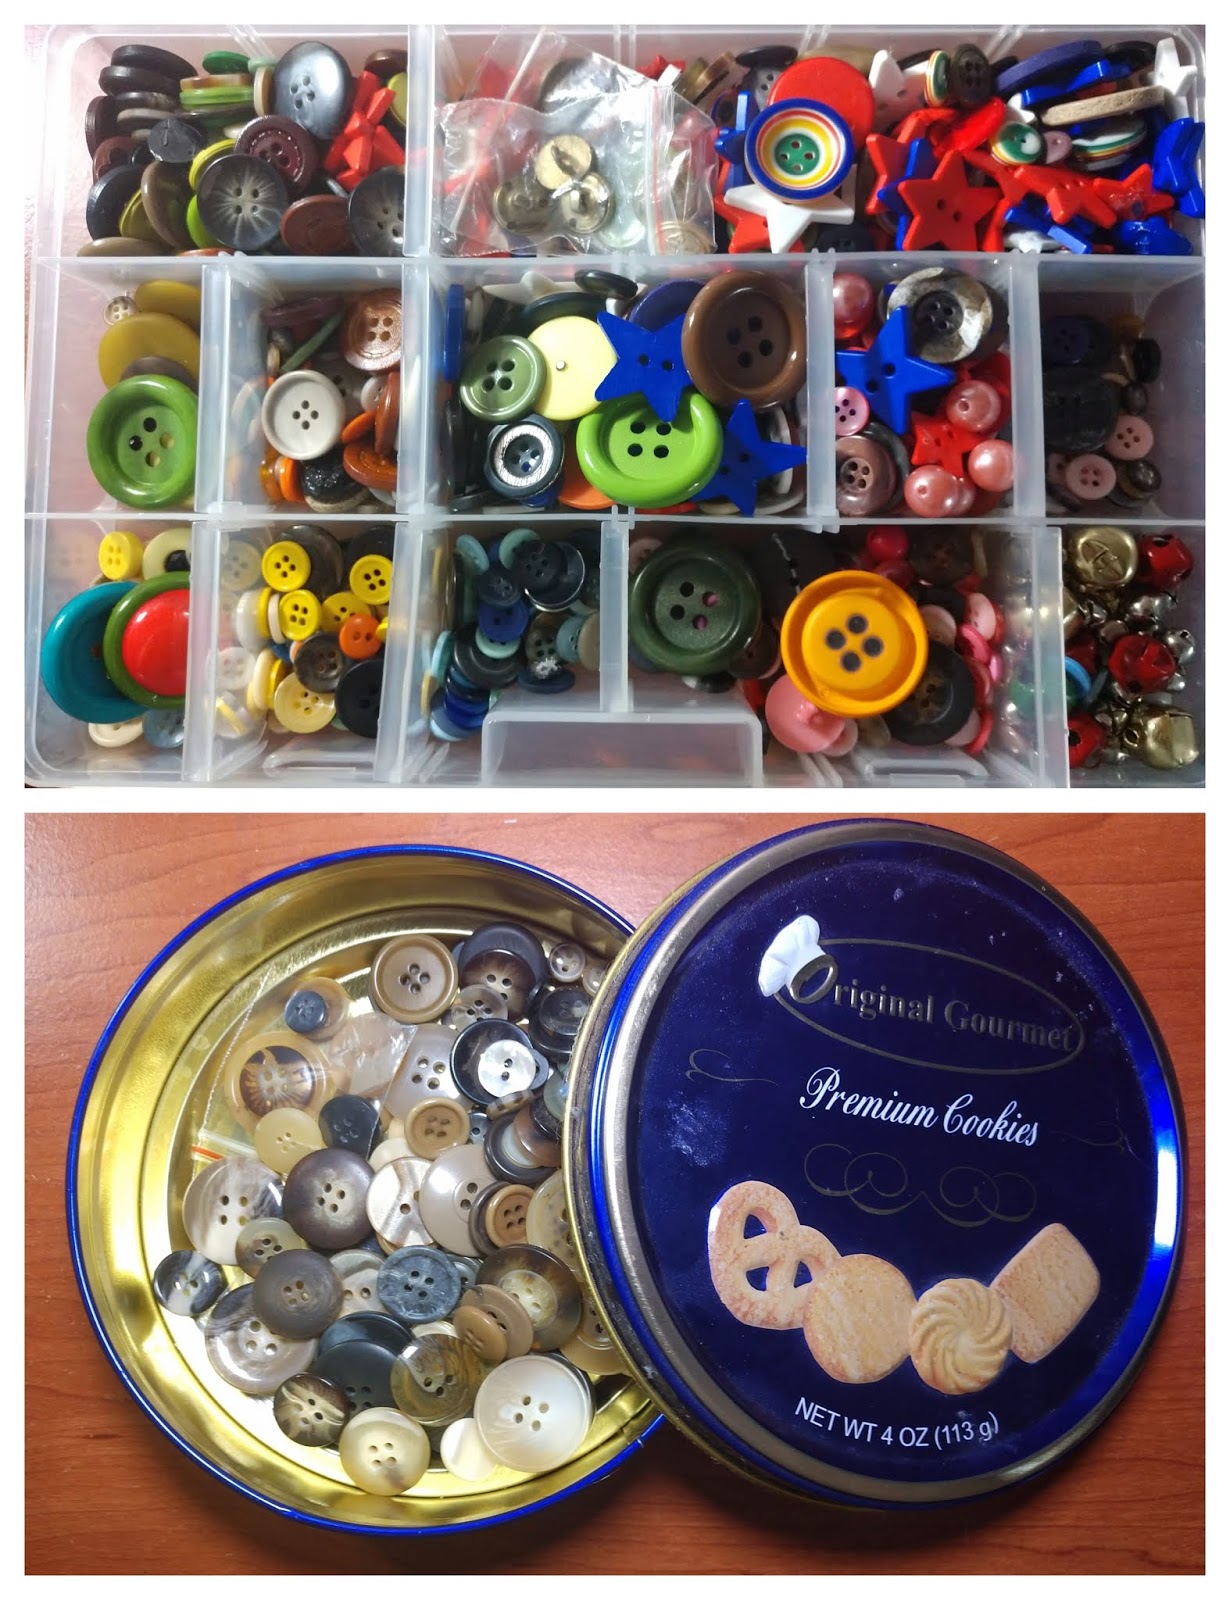
I sure hope that you have come to appreciate and understand buttons just a little bit more, at least enough to make them a little less scary.
I look forward to seeing all of your Goodnight Darling Nightgowns and RobesT with buttons in the very near future!


Leave a Comment