
Adding Some Love to Knit Cuffs 💕

If you’re anything like me, you had lofty goals of completing some Valentine’s Day sewing well in advance of the big day. Then, BOOM! Suddenly, you’re realizing that time is running too short to order that amazing fabric you’ve been eyeing up for months. Why aren’t there EVER enough hours in a day??
If this sounds familiar, I have great news for you! This post will step you through a wonderful little hack to add a heart-shaped cutout to any knit cuff for kids or adults. Even better, you can probably use fabric straight from your stash, AND your new garment can be worn for Valentine’s Day and beyond!
The details that follow use a sleeve cuff as an example, but this technique would work well for jogger cuffs, too. It could also be modified and added to a lined bodice or skirt!
For my make, I used the top from Eunoia’s Snuggle Set pattern, which comes in both baby and youth sizes. The longer grow-with-me cuff option was perfect, because it gave me a little extra room to add a larger heart. For reference, I made a size 2T.
If you’re looking to add this detail to an adult pattern instead, the Cobalt has a perfect, long cuff option. Adding a cutout to the ankle cuff of the Tasche Joggers would also be a great idea.
Ready to get started? Ok, let’s do this!

To begin, cut the pattern of your choice exactly to the instructions, EXCEPT… you’ll want to cut an extra cuff piece for each cutout cuff you plan to create.
I recommend choosing a relatively thin fabric for your cutout cuffs, because they will end up double the thickness of a regular cuff. The added layer is what will hide the raw edges of the cutout and give the opportunity for a contrasting under-layer.
I used a 190 gsm poly-spandex (93%/7%) rib knit. The ivory layer will become my outer layer, and the pink layer will become my inner layer.

The first step is figuring out the placement of your cutout. To help with this, fold your cuff pieces in half lengthwise down the vertical axis and press a center line.

Open the cuff to confirm the center line is visible…

…and then fold it half widthwise across the horizontal axis. There is no need to press this fold in place, but be sure to orient your cuff so that the fold runs along the bottom edge and the raw edges are along the top. This will ensure your heart is right side up when the cuff is complete and sewn to your garment.

Next, you will create your heart stencil. I folded a piece of scrap paper in half and drew a couple of different heart shapes to see what would work best.

My best recommendation for this step is to draw your heart narrower than you want the finished cutout to be. The horizontal stretch of the cuff will cause the final heart to end up wider than the stencil.
Cut the heart stencil from the paper, and place it on your fabric. Line up the vertical, center folds of your fabric and paper to help place and straighten your stencil. Be sure to leave enough space above and below so that the cutout will clear the bottom fold while allowing enough room above for the seam allowance needed to attach the cuff to the garment.

Trace the stencil onto the wrong side of one cuff piece using disappearing ink or chalk. I traced mine onto the wrong side of the inner fabric, because I’m always paranoid that my markings will somehow become spontaneously permanent. Admittedly, there is likely no need for this level of paranoia. 🙂

Line up and stack your two cuff pieces right sides together, with the marked fabric on top. Pin in place.

Sew the heart shape through both layers, following the stencil markings. Be sure to backstitch at the beginning and end to keep the heart from unraveling.

Carefully cut out the center of the heart, approximately 1/8 inch inside the stitching. Cut notches into your curves and points to allow some ease for turning out the heart in the next step.

Pick up the corners of the top layer of fabric and push them through the center of the heart. Pass the entire top layer of fabric through to the other side.

Use your fingers to smooth the heart as best you can. Use a blunt object to help form the points and push out the curves. At this stage, your heart will probably look a little messy and puckery. Don’t panic – your iron will come to the rescue!
Your cuff piece should now be wrong sides together.

Press the heart flat. Use steam, as long as it won’t anger your fabric.

Phew! Let’s take a short break and admire your work, shall we? Ooolala! It is looking GOOD.
Let’s also take this opportunity to make sure everything is oriented properly. Place your cuff with the outer fabric facing up, and then fold the bottom half under. Your cuff should now look like this, with the inner fabric showing through the heart cutout.

Pat yourself on the back; the hard part is done!
Aaaaaand, now let’s get back to business.
Open your cuff flat, and then re-fold it lengthwise along the vertical axis, right sides (outer fabric) together. Sew along that vertical raw edge, as you would for any regular ol’ cuff.

Turn your cuff right side out and fold it in half widthwise to prepare it to be sewn to your garment, just like the pattern instructions state.

The rest of your garment can now be sewn as instructed, and your fancy-schmancy cutout cuffs can be attached just like any normal cuff.
Be sure to double (triple… QUADRUPLE!) check that the heart cutout is placed against the right side of your garment before sewing so that the heart ends up on the outside of the cuff and not the inside!
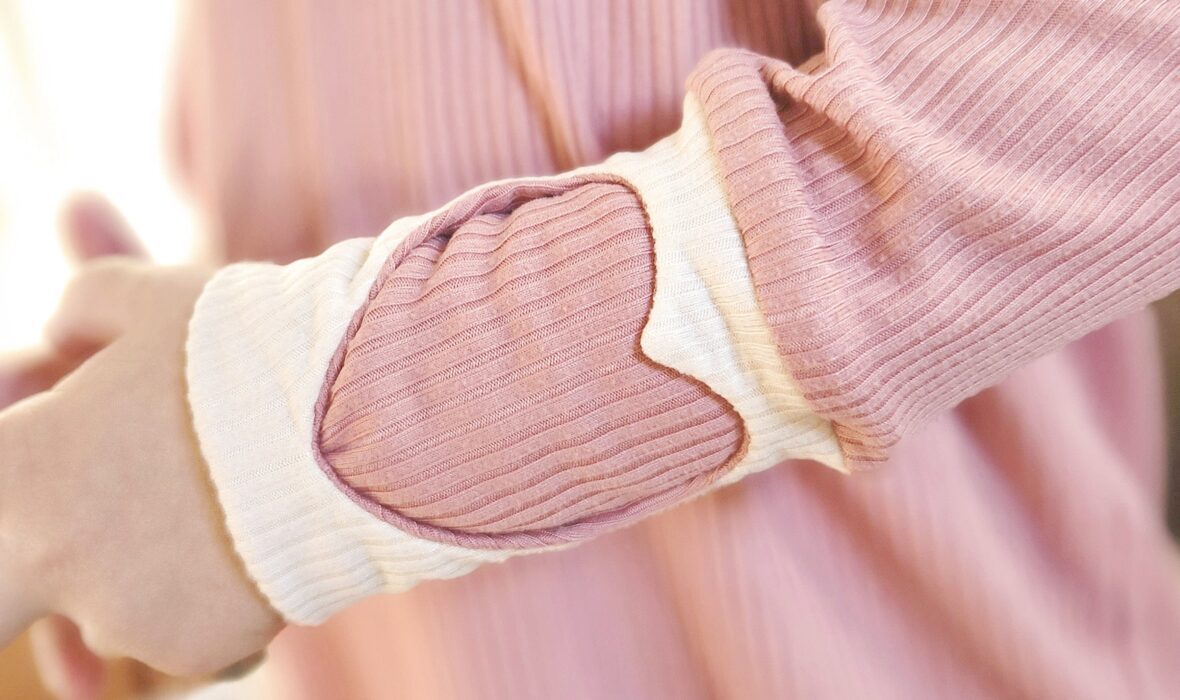
As you can see, I chose to only add one heart cuff to this sweater, because I love all things asymmetrical. The only other modification I made to this top was that I shortened the sleeve about two inches to account for the extra length of the grow-with-me cuff. I didn’t want any excess fabric bunching in the sleeve and covering up my handywork!
Thanks so much for reading along! Please don’t forget to share the heck out of your gorgeous heart cutouts in our Facebook Group. We can’t wait to see them!
Talk soon!
Connie


Leave a Comment